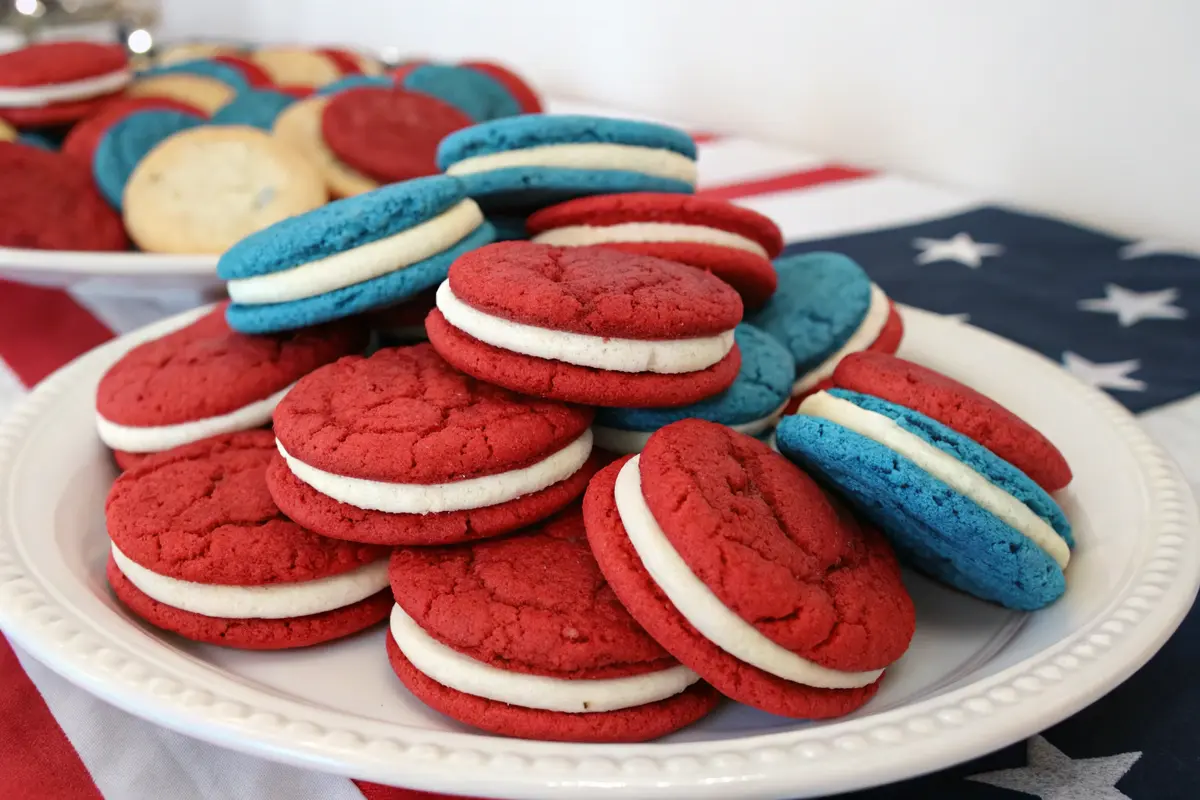
Festive Red White and Blue Delights: Perfect Patriotic Treats
A Colorful Twist on Classic Cookies
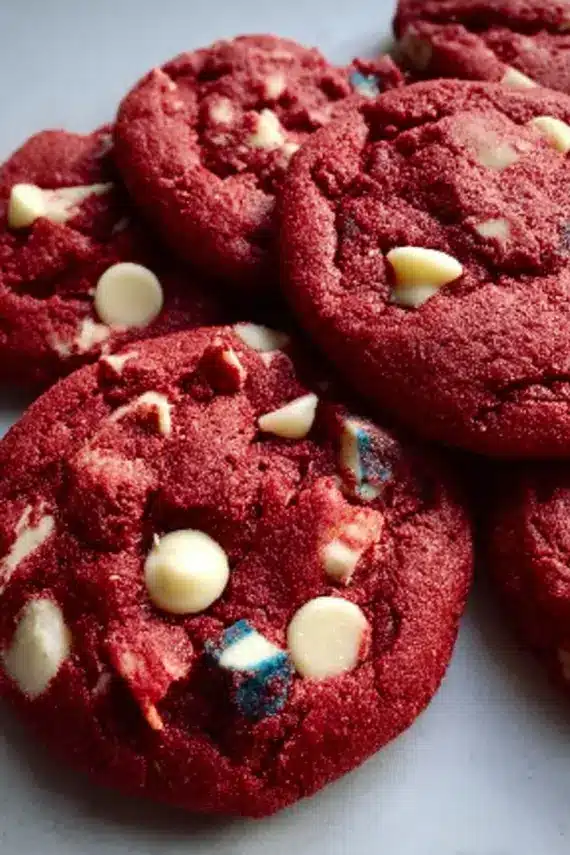
Red white blue red velvet cookies are the ultimate festive treat that brings together classic red velvet flavors with a patriotic color scheme perfect for summer celebrations. These eye-catching cookies feature the rich cocoa undertones of traditional red velvet combined with vibrant red and blue swirls against a creamy white backdrop, creating an edible masterpiece that’s as beautiful as it is delicious. “The Buffalo Chicken Grilled Cheese creates a similarly bold color contrast, though in a savory application that’s just as visually striking.”
These cookies are ideal for Fourth of July gatherings, Memorial Day picnics, Labor Day barbecues, or anytime you want to add a patriotic touch to your dessert table. Their soft, chewy texture combined with pops of white chocolate make them irresistible to guests of all ages, and they’re simple enough that even novice bakers can achieve impressive results.
Everything You’ll Need for Perfect Patriotic Sweets
Essential Ingredients for Success
Creating these showstopping red white blue red velvet cookies requires a thoughtful combination of ingredients that deliver both the distinctive red velvet flavor and the stunning patriotic appearance. “The Pumpkin Cheesecake relies on similar base ingredients like cream cheese and sugar to create its velvety texture, though with a completely different flavor profile.”
| Base Ingredients | Amount | Notes |
|---|---|---|
| Unsalted butter | 1 cup (2 sticks) | Softened to room temperature for proper creaming |
| Granulated sugar | 1 cup | Provides sweetness and structure |
| Brown sugar | 1/2 cup | Adds moisture and deeper flavor |
| Egg | 1 large | Room temperature for better incorporation |
| Vanilla extract | 1 teaspoon | Use pure for best flavor |
| All-purpose flour | 2 1/2 cups | Spooned and leveled for accuracy |
| Unsweetened cocoa powder | 2 tablespoons | Natural, not Dutch-processed, for authentic red velvet flavor |
| Baking soda | 1 teaspoon | For proper leavening |
| Salt | 1/2 teaspoon | Enhances flavors |
| Red food coloring | 2 tablespoons | Gel coloring provides vibrant color with less liquid |
| Blue food coloring | 1 tablespoon | Gel coloring recommended |
| White chocolate chips | 1 cup | Premium quality for better melting |
Optional Enhancements
| Ingredient | Amount | Purpose |
|---|---|---|
| Cream cheese | 4 ounces | For authentic red velvet flavor in optional frosting |
| Powdered sugar | 1 1/2 cups | For optional cream cheese frosting |
| White sprinkles | 1/4 cup | For additional decoration |
| Red and blue star-shaped sprinkles | 1/4 cup | For patriotic garnish |
| Almond extract | 1/4 teaspoon | Optional flavor enhancer |
| White candy melts | 1/2 cup | Alternative to white chocolate chips |
| Mascarpone cheese | 2 ounces | Luxurious addition to optional frosting |
| Buttermilk powder | 1 tablespoon | Adds tanginess to cookie dough |
Creating Your Patriotic Cookie Masterpieces: Step-by-Step Guide
Preparing the Perfect Red Velvet Dough Base
Follow these detailed steps to create beautiful, delicious red white blue red velvet cookies that will impress at any gathering:
1. Preheat and prepare: Set your oven to 350°F (175°C) and line two baking sheets with parchment paper or silicone mats. This prevents sticking and ensures even baking. Position your racks in the upper and lower thirds of the oven.
2. Cream the butter and sugars: In the bowl of a stand mixer fitted with the paddle attachment (or using a hand mixer), beat the softened butter, granulated sugar, and brown sugar on medium-high speed for 3-4 minutes until light and fluffy. The mixture should be pale in color and noticeably increased in volume. Scrape down the sides of the bowl halfway through.
3. Add wet ingredients: Add the egg and vanilla extract to the butter-sugar mixture and mix on medium speed until fully incorporated, about 1 minute. The mixture should be smooth and glossy. If using almond extract for flavor enhancement, add it at this stage.
4. Combine dry ingredients: In a separate medium bowl, whisk together the all-purpose flour, cocoa powder, baking soda, and salt until evenly distributed. The cocoa powder should be completely incorporated with no visible streaks.
5. Combine wet and dry mixtures: Gradually add the dry ingredients to the wet ingredients in three additions, mixing on low speed just until incorporated after each addition. Be careful not to overmix, as this can result in tough cookies. Stop the mixer when you still see a few streaks of flour remaining.
6. Divide and color the dough: Remove the bowl from the mixer and give the dough a final stir by hand to incorporate any remaining dry ingredients. Divide the dough into three equal portions (about 1 1/2 cups each) in separate bowls.
7. Create colored doughs: Add the red food coloring to one portion of dough and mix thoroughly until the color is uniform. Do the same with the blue food coloring in another portion. Leave the third portion natural (white). Fold 1/2 cup white chocolate chips into the white portion only.
8. Prepare for baking: Using a medium cookie scoop (about 1 1/2 tablespoons), scoop small portions of each colored dough. For each cookie, place one scoop each of red, white, and blue dough close together on the prepared baking sheet, spacing cookies about 2 inches apart.
9. Create marbled effect: Use a butter knife or small offset spatula to gently swirl the doughs together with just 1-2 strokes. Don’t overmix or you’ll lose the distinct colors. The goal is a marbled effect with visible red, white, and blue sections.
10. Bake to perfection: Bake for 10-12 minutes, rotating the pans halfway through, until the edges are just set but centers still appear slightly underdone. Look for slight firmness at the edges with a soft center – they’ll continue cooking on the hot baking sheet.
11. Cool properly: Allow the cookies to rest on the baking sheet for 5 minutes before transferring to a wire rack to cool completely. This resting period lets them firm up enough to transfer without breaking.
12. Optional frosting: If desired, once cookies are completely cool, prepare cream cheese frosting by beating 4 ounces softened cream cheese with 1/4 cup butter until smooth, then gradually adding 1 1/2 cups powdered sugar and 1 teaspoon vanilla. Pipe or spread a small amount on each cookie and top with additional white chocolate chips or patriotic sprinkles.
Expert Baking Insights for Cookie Success
Professional Techniques for Perfect Results
Follow these expert tips to ensure your red white blue red velvet cookies turn out perfectly every time:
* Accurate temperature control: Make sure your butter is properly softened but not melted. It should yield slightly to gentle pressure but still hold its shape. Too soft butter creates flat cookies, while too cold butter won’t cream properly.
* Color intensity techniques: For more vibrant colors, use gel food coloring rather than liquid. Gel colors provide deeper hues without adding excess moisture to your dough that could affect the texture. Add color gradually until you reach your desired shade.
* Cocoa matters: Use natural (non-Dutch processed) cocoa powder for authentic red velvet flavor. The natural acidity in regular cocoa powder reacts with the baking soda and helps the red color develop more vibrantly.
* Marbling technique: For the most striking visual effect, don’t overwork the colored doughs when marbling. Just 1-2 gentle swirls with a butter knife or toothpick will create beautiful patterns while maintaining distinct color separation.
* Texture secrets: For softer cookies, slightly underbake them by removing from the oven when the edges are set but the centers still look slightly underdone. For crispier cookies, bake 1-2 minutes longer until the centers are also set. “The Boneless Skinless Chicken Thighs in Oven recipe uses a similar technique of visual cues rather than strict timing to determine perfect doneness.”
* Prevent spreading: If your cookie dough feels too soft after coloring, refrigerate it for 20-30 minutes before scooping and baking. Chilled dough spreads less during baking, resulting in thicker, chewier cookies with more defined swirl patterns.
* Holiday customization: For other holidays, modify the color scheme while keeping the same technique. Try orange and black for Halloween, green and red for Christmas, or school colors for graduation celebrations.
Keeping Your Patriotic Treats Fresh and Delicious
Best Practices for Cookie Storage
Proper storage is essential for maintaining the flavor, texture, and appearance of your red white blue red velvet cookies. Here’s how to keep them tasting their best:
* Room temperature storage: Store unfrosted cookies in an airtight container at room temperature for up to 5 days. Place parchment paper between layers to prevent sticking and color transfer. Adding a slice of bread to the container helps maintain moisture and prevents cookies from hardening.
* Refrigerator considerations: If you’ve added cream cheese frosting, refrigeration is necessary. Store frosted cookies in a single layer in an airtight container for up to 3 days. Allow refrigerated cookies to come to room temperature for about 15 minutes before serving for the best flavor and texture.
* Freezing for longevity: These cookies freeze beautifully for up to 3 months. For unfrosted cookies, place them in a freezer-safe container with parchment between layers. For frosted cookies, freeze them uncovered on a baking sheet until solid (about 1 hour), then transfer to a container. This prevents the frosting from smudging.
* Dough preparation in advance: You can prepare and color the dough up to 2 days ahead and store it in the refrigerator. Bring it to room temperature for about 30 minutes before scooping and baking. Alternatively, scoop the dough onto baking sheets, freeze until solid, then transfer the unbaked cookie balls to freezer bags for up to 3 months. Bake directly from frozen, adding 1-2 minutes to the baking time. “The Olive Garden Salad Recipe demonstrates similar make-ahead techniques that help streamline preparation without compromising on quality.”
* Preserving vibrant colors: To maintain the brightest colors, store cookies away from direct sunlight, which can cause fading. If shipping these cookies, choose an insulated container and express shipping to preserve their quality.
Creative Twists on Classic Patriotic Cookies
Delicious Variations to Try
While the classic red white blue red velvet cookies are stunning on their own, here are some exciting variations to keep your patriotic treats fresh and interesting:
* White Chocolate Stuffed Version: Instead of mixing white chocolate chips into the dough, flatten each color of dough slightly, place a whole white chocolate square or a few white chocolate chips in the center, then wrap and seal the dough around it before marbling. When baked, these cookies will have a melted white chocolate center that oozes out when broken open.
* Cream Cheese Swirl Edition: Create a cream cheese filling by mixing 4 oz softened cream cheese with 1/4 cup sugar and 1/2 teaspoon vanilla. After placing scoops of colored dough on the baking sheet but before swirling, add a teaspoon of this mixture. When you create the marble effect, the cream cheese will create beautiful white streaks that bake into tangy pockets within the cookie.
* Double Chocolate Patriotic Cookies: Replace the white dough portion with chocolate dough by adding an additional 2 tablespoons of cocoa powder to that portion. You’ll have a chocolate, red, and blue marbled cookie with an even richer flavor profile perfect for chocolate lovers.
* Crispy-Edge Version: Roll the edges of each marbled cookie dough ball in white granulated sugar before baking. This creates a slightly crispy, sparkly exterior while maintaining the soft interior, adding textural contrast and a touch of extra sweetness.
* Berry-Infused Patriotic Cookies: Add freeze-dried strawberry powder (1 tablespoon) to the red dough portion and freeze-dried blueberry powder (1 tablespoon) to the blue dough portion. This adds natural fruit flavor and enhances the thematic connection to classic red, white, and blue berries.
* Cheesecake-Topped Variation: After baking and cooling the cookies, top each with a small dollop of no-bake cheesecake mixture (8 oz cream cheese, 1/4 cup sugar, 1/2 teaspoon vanilla) and garnish with fresh blueberries and strawberries for a fresh fruit element that enhances the patriotic theme.
Showcasing Your Patriotic Cookie Creations
Perfect Presentation and Serving Ideas
Make the most of your red white blue red velvet cookies with these thoughtful serving suggestions that will elevate your patriotic dessert experience:
* Layered Cookie Stacks: Create impressive dessert plates by stacking cookies in alternating directions with thin layers of vanilla whipped cream between them. Top with a sprinkle of red and blue star sprinkles for a dessert that’s both sophisticated and festive. This fresh Caprese pasta salad uses a similar layering technique to create visual impact with its ingredients.
* Ice Cream Sandwich Assembly Station: Set up a build-your-own ice cream sandwich bar featuring your cookies with vanilla ice cream and patriotic toppings like red and blue sprinkles, white chocolate shavings, and fresh berries. This interactive dessert option is perfect for summer gatherings and lets guests customize their treat.
* Cookie Gift Packages: Package cookies in clear cellophane bags tied with red, white, and blue ribbons for party favors or host gifts. Include a tag with storage instructions so recipients can enjoy them at their freshest.
* Patriotic Dessert Trifle: Crumble some of your cookies and layer them in clear trifle glasses with alternating layers of vanilla pudding, whipped cream, and fresh berries for a spectacular red, white, and blue dessert that showcases the cookies in a new format.
* Cookie Platters with Purpose: Arrange cookies in the shape of an American flag on a rectangular serving platter, using the red, white and blue marbled cookies to create a wavy flag effect. This makes for a stunning centerpiece dessert at any patriotic gathering.
* Family Celebration Tradition: Serve these cookies as part of an annual tradition for patriotic holidays, perhaps paired with homemade vanilla ice cream and fresh summer berries for a complete dessert experience that families will look forward to year after year.

Answering Your Cookie Questions
Expert Solutions to Common Baking Challenges
Can I make these red white blue red velvet cookies without food coloring?
Yes, you can create natural versions using food-based colorings. For the red portion, use 2 tablespoons of beet powder or reduced beet juice. For blue, try butterfly pea powder or spirulina powder mixed with a tiny bit of baking soda (which shifts the color toward blue). The colors won’t be as vibrant as with food coloring, but they’ll provide a more subtle, natural patriotic effect. Keep in mind that natural colorings may slightly alter the flavor profile.
Why did my cookies lose their vibrant color after baking?
This typically happens for two reasons: either the food coloring wasn’t heat-stable or the cookies were overbaked. Use gel food coloring specifically labeled as heat-stable for baking. Also, slightly underbake the cookies, removing them when the edges are just set but centers still look soft. They’ll continue cooking on the hot baking sheet but retain more vibrant color than if left in the oven until completely firm.
Can these cookies be made gluten-free?
Absolutely! Replace the all-purpose flour with a 1:1 gluten-free baking flour blend that contains xanthan gum. Brands like Bob’s Red Mill, King Arthur, or Cup4Cup work well in this recipe. You may need to add an extra tablespoon of the gluten-free flour blend if the dough seems too wet. The texture may be slightly different – a bit more tender and delicate – but the flavor and appearance will be comparable to the original version. “The Texas Roadhouse Smothered Chicken offers similar adaptability for those with dietary restrictions while maintaining the core flavor profile.”
A Colorful Finale to Your Patriotic Baking Adventure
Celebrating with Homemade Red, White, and Blue Treats
These red white blue red velvet cookies are more than just a dessert – they’re a festive way to celebrate American pride through the joy of baking. The beautiful marbled effect of vibrant red, pristine white, and bold blue creates cookies that are as visually stunning as they are delicious, making them perfect for everything from casual backyard barbecues to elegant Fourth of July dinner parties. “The Mexican Chicken Vegetable Soup brings the same level of visual appeal through its colorful ingredients, though in a savory application that could balance these sweet treats in a full menu.”
Remember that the beauty of these patriotic cookies lies in their homemade charm – don’t worry if each one looks slightly different, as those variations add to their handcrafted appeal. Whether you’re baking them with children as a holiday activity or preparing them as a surprise for a veterans’ appreciation event, these cookies carry both flavor and meaning to your table.
We hope this recipe becomes a cherished part of your patriotic celebration traditions. The combination of classic red velvet flavor with the eye-catching red, white, and blue design creates a treat that honors American celebrations while satisfying your sweet tooth. Share your creations with loved ones, experiment with the variations we’ve suggested, and most importantly, enjoy the process of creating something both beautiful and delicious.
PrintRed White Blue Red Velvet Cookies

- Festive red white blue red velvet cookies perfect for patriotic celebrations.
- Soft, chewy cookies with vibrant marbled colors and white chocolate chips.
- An easy yet impressive dessert for Fourth of July, Memorial Day, or any patriotic gathering.
- Prep Time: 20
- Cook Time: 12
- Total Time: 32 minutes
- Yield: 24 cookies 1x
- Category: Dessert
- Method: Baking
- Cuisine: American
Ingredients
- 1 cup (2 sticks) unsalted butter, softened
- 1 cup granulated sugar
- 1/2 cup brown sugar, packed
- 1 large egg, room temperature
- 1 teaspoon vanilla extract
- 2 1/2 cups all-purpose flour
- 2 tablespoons unsweetened cocoa powder (natural, not Dutch-processed)
- 1 teaspoon baking soda
- 1/2 teaspoon salt
- 2 tablespoons red food coloring (preferably gel)
- 1 tablespoon blue food coloring (preferably gel)
- 1 cup white chocolate chips
- Optional Cream Cheese Frosting:
- 4 ounces cream cheese, softened
- 1/4 cup unsalted butter, softened
- 1 1/2 cups powdered sugar
- 1/2 teaspoon vanilla extract
- Patriotic sprinkles for decoration (optional)
Instructions
- Preheat oven to 350°F (175°C) and line two baking sheets with parchment paper.
- In a large bowl, cream together butter, granulated sugar, and brown sugar until light and fluffy, about 3-4 minutes.
- Add egg and vanilla extract; mix until fully incorporated and smooth.
- In a separate bowl, whisk together flour, cocoa powder, baking soda, and salt until well combined.
- Gradually add dry ingredients to wet mixture, mixing on low speed just until incorporated. Do not overmix.
- Divide dough into three equal portions in separate bowls.
- Add red food coloring to one portion and mix thoroughly until the color is uniform.
- Add blue food coloring to another portion and mix thoroughly.
- Leave the third portion natural (white) and fold in 1/2 cup of white chocolate chips.
- Using a medium cookie scoop (about 1 1/2 tablespoons), place one scoop each of red, white, and blue dough close together on the prepared baking sheet, spacing cookies 2 inches apart.
- Use a butter knife or small offset spatula to gently swirl the doughs together with just 1-2 strokes to create a marbled effect. Don’t overmix.
- Bake for 10-12 minutes, until edges are just set but centers still appear slightly underdone.
- Allow cookies to rest on the baking sheet for 5 minutes before transferring to a wire rack to cool completely.
- If desired, once cookies are completely cool, top with cream cheese frosting and patriotic sprinkles.
- For optional cream cheese frosting:
- Beat together softened cream cheese and butter until smooth and creamy.
- Gradually add powdered sugar and vanilla, beating until light and fluffy.
- Spread or pipe onto completely cooled cookies and add sprinkles if desired.
Notes
- For the most vibrant colors, use gel food coloring rather than liquid.
- Slightly underbake the cookies for a softer, chewier texture.
- Store unfrosted cookies in an airtight container at room temperature for up to 5 days.
- If using cream cheese frosting, cookies must be refrigerated.
- For make-ahead convenience, you can freeze the cookie dough for up to 3 months.
- Nutrition facts are estimates and may vary based on ingredients used, portion sizes, and preparation methods.
Nutrition
- Serving Size: 1 cookie
- Calories: 210
- Sugar: 18
- Sodium: 125
- Fat: 11
- Saturated Fat: 7
- Unsaturated Fat: 3
- Carbohydrates: 28
- Fiber: 1
- Protein: 2
- Cholesterol: 30
Keywords: red white blue red velvet cookies, patriotic cookies, holiday cookies, festive dessert, 4th of july cookies, memorial day dessert, red velvet cookies
Let’s connect! Follow me for more Joylicious Recipes: Facebook, Instagram, Pinterest