The Best Ice Cream Cone Cupcakes – Fun To Make, Easy To Serve!
Ice cream cone cupcakes are fun, colorful desserts that combine the charm of ice cream with the ease of cupcakes. You bake the batter right inside flat-bottomed cones, then top them with frosting that looks just like soft-serve. No melting. No mess. Just pure fun.
They work perfectly for birthdays, cookouts, or school parties. Kids love how they look, and parents appreciate how easy they are to serve. You don’t need forks, plates, or cleanup—just grab and go.
In this article, you’ll learn how to make perfect cone cupcakes every time. We’ll walk through the ingredients, the baking process, decorating tips, and even storage and travel hacks.
Check out our guide to ice cream cones for more ways to get creative with cone-based desserts.
Let’s get baking and turn these fun little treats into the highlight of your next event.
Introduction to Ice Cream Cone Cupcakes
What Are Ice Cream Cone Cupcakes?
Ice cream cone cupcakes are a playful spin on classic cupcakes. Instead of baking them in liners, you pour the batter into flat-bottomed cones. As they bake, the cupcakes rise beautifully inside the cones. After cooling, they’re topped with frosting that looks just like soft-serve ice cream.
These desserts aren’t just adorable—they’re also functional. Since you can eat the cones, there’s no waste left behind. That means no messy wrappers or dirty plates. Even better, kids and adults can enjoy them without needing utensils.
Plus, they’re fun to customize. You can change up the frosting colors, use seasonal sprinkles, or even switch the cake flavors. No matter how you dress them up, they always make a statement.
Looking for a creative twist? Try these mini ice cream cone treats for bite-sized fun at your next event.
Why They’re the Perfect Party Dessert
Without a doubt, ice cream cone cupcakes make dessert tables more exciting. Not only do they grab attention, but they also reduce cleanup. Since there’s no need for paper liners or plastic forks, they’re perfect for outdoor events and birthday parties.
Additionally, they’re easy to serve. You can bake them directly in a muffin tin and display them upright without a stand. Because the cones hold their shape, guests can grab one and go—no fuss.
If you’re planning a celebration, these cupcakes bring both fun and function to the table. Don’t miss our vegan ice cream recipes if you’re looking to expand your dessert options even more.
Ingredients and Essential Tools
Full List of Ingredients and Substitutions
To bake irresistible ice cream cone cupcakes, you’ll need simple ingredients that work together to deliver flavor and texture. While most items are pantry staples, a few specialty ingredients make a big difference.
Cupcake Batter Ingredients:
- 12 flat-bottomed ice cream cones
- ¼ cup (56 g) unsalted butter, softened
- ¼ cup (60 ml) neutral oil (canola, vegetable, or avocado)
- ¾ cup (150 g) granulated sugar
- 2 large eggs, room temperature
- 1½ teaspoons vanilla extract
- 1½ cups (185 g) all-purpose flour
- 1½ teaspoons baking powder
- ¼ teaspoon salt
- ⅔ cup (160 ml) buttermilk
- 3 tablespoons soft sprinkles or quinns (optional, but not nonpareils)
Cream Cheese Frosting Ingredients:
- ½ cup (113 g) unsalted butter, softened
- 8 oz (226 g) brick-style cream cheese
- ¼ teaspoon salt
- 1 teaspoon vanilla extract
- 4 cups (500 g) powdered sugar
- ¼ cup (33 g) cocoa powder (optional)
- 1–3 tablespoons heavy cream or milk
- Extra sprinkles for garnish (optional)
Ingredient Notes:
To start, make sure you use brick-style cream cheese. Spreadable versions contain too much moisture and will make your frosting too soft.
Moreover, buttermilk helps create moist, tender cupcakes. If you’re out, stir 1 tablespoon of lemon juice or vinegar into ⅔ cup milk. Let it rest for 5 minutes before using.
In addition, choose sprinkles wisely. Nonpareils often bleed color into the batter, but jimmies and quinns stay intact.
Need flavor inspiration? Don’t miss our strawberry shortcake ice cream recipe to spark ideas for frosting pairings.
Kitchen Tools You’ll Need
When it comes to baking ice cream cone cupcakes, the right tools save time and reduce mess. Although fancy equipment isn’t required, a few basics go a long way.
Essential Tools:
- Cupcake pan or muffin tin – supports cones during baking
- Hand or stand mixer – mixes batter and frosting quickly
- Two mixing bowls – one for dry, one for wet ingredients
- Ice cream scoop – makes portioning neat and even
- Piping bag with a star tip – gives frosting that real swirl look
- Aluminum foil (optional) – keeps cones steady if needed
Before mixing anything, measure all your ingredients. That way, your prep stays smooth, and your cupcakes bake evenly.
Also, make sure the cones stay upright in the oven to prevent tipping. You can support them with foil if needed, but most cupcake pans work perfectly on their own.
Also, don’t forget to clean your piping tip between colors or frosting batches. This small step keeps your swirls sharp and photo-ready.
Want more tips? Discover great ideas like our kitchen gear guide to level up your baking game.
Step-by-Step Recipe for Ice Cream Cone Cupcakes
Preparing the Cupcake Batter
Let’s start by making the batter for your ice cream cone cupcakes. This part comes together quickly if you prep your ingredients ahead of time.
- Preheat the oven to 350°F (175°C). Place the cones upright inside a cupcake pan. If any feel wobbly, wrap a little foil around the base for support.
- In a large mixing bowl, cream the butter, oil, and sugar using a hand or stand mixer. Keep beating until the mixture turns light and fluffy.
- Add the eggs one at a time. After each addition, mix well. Then, stir in the vanilla extract.
- In another bowl, combine the flour, baking powder, and salt by whisking them together.
- Now, alternate adding the dry mixture and buttermilk into the wet ingredients. Start and end with flour. Use a spatula to fold gently between each addition.
At this point, you should have a smooth batter. If you’re using sprinkles, fold them in now for a festive touch. However, avoid overmixing—this keeps your cupcakes soft.
Baking Cupcakes in Ice Cream Cones Properly
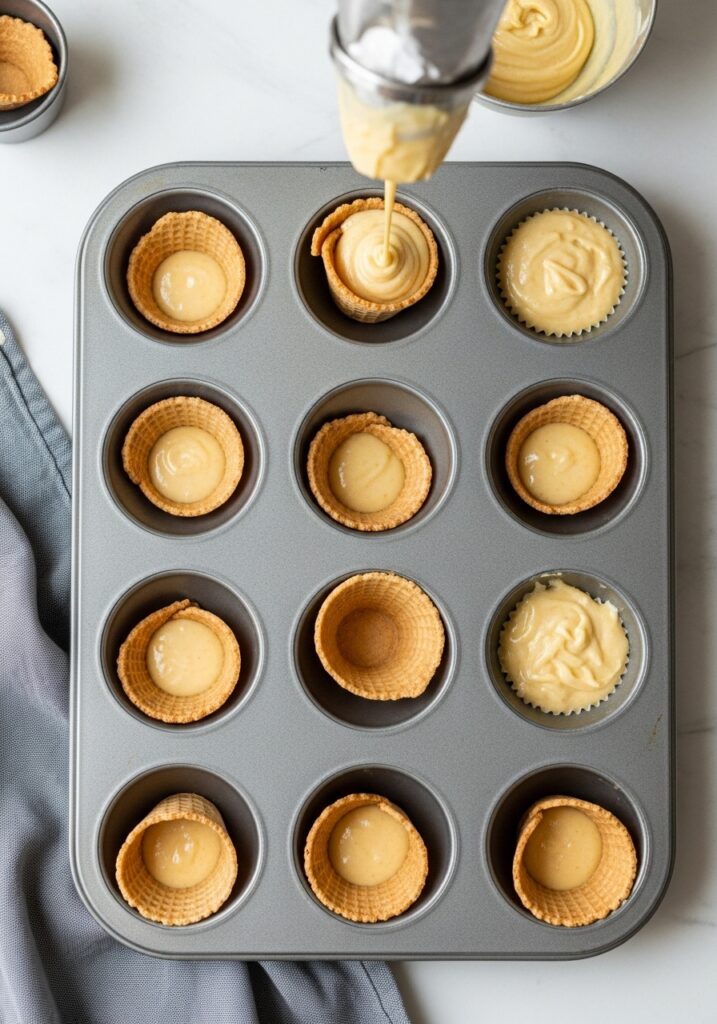
Now comes the fun part—filling and baking the edible cones. It’s easy when you take your time.
- Using an ice cream scoop, fill each cone about ¾ full. The batter should come up to the first inner ridge of the cone.
- Carefully place the pan in the oven. Try not to bump it, as the cones can tip if jolted.
- Bake for 20–23 minutes, or until a toothpick inserted in the center comes out clean or with just a few moist crumbs.
Once baked, let the cupcakes cool completely in the pan. This prevents the cones from cracking and keeps the tops from sliding.
Meanwhile, resist the urge to frost while warm. Doing so causes the frosting to melt and lose shape.
Want to explore cone types? Don’t miss our mini ice cream cone recipe for another fun take on this treat.
Making the Cream Cheese Frosting
Cream Cheese Frosting Ingredients
Now that your ice cream cone cupcakes are baked and cooling, it’s time to make the frosting. This version uses cream cheese and butter for a rich, smooth texture. When whipped properly, it pipes beautifully and holds its shape like a real ice cream swirl.
Here’s what you’ll need:
- ½ cup (113 g) unsalted butter, softened
- 8 oz (226 g) cream cheese, brick-style
- ¼ teaspoon salt
- 1 teaspoon vanilla extract
- 4 cups (500 g) powdered sugar
- ¼ cup (33 g) cocoa powder (optional)
- 1–3 tablespoons heavy cream or milk
- Optional: extra sprinkles or toppings
Why brick-style cream cheese? It creates a firmer, more stable frosting. Spreadable versions won’t hold the swirl, especially in warm weather.
If you’re going for chocolate flavor, include the cocoa powder. Otherwise, leave it out for a classic vanilla finish.
Looking for more color or fun? Mix in a few drops of food coloring to coordinate with your party colors.
How to Pipe the Frosting Like Real Ice Cream
Once you’ve gathered your ingredients, follow these steps to make and pipe the frosting:
- In a large bowl, beat the butter and cream cheese until smooth and creamy. A stand mixer works best, but a hand mixer does the job too.
- Next, add the salt and vanilla extract. Mix until fully blended.
- Gradually add powdered sugar, mixing on low to avoid a cloud of sugar. Scrape down the sides as needed.
- If you’re using cocoa powder, add it now and beat until combined.
- At this point, the frosting will be thick. Pour in 1 tablespoon of cream or milk, then stir until combined. If needed, add more—1 tablespoon at a time—until you reach a creamy but stiff consistency.
Now comes the fun part: piping!
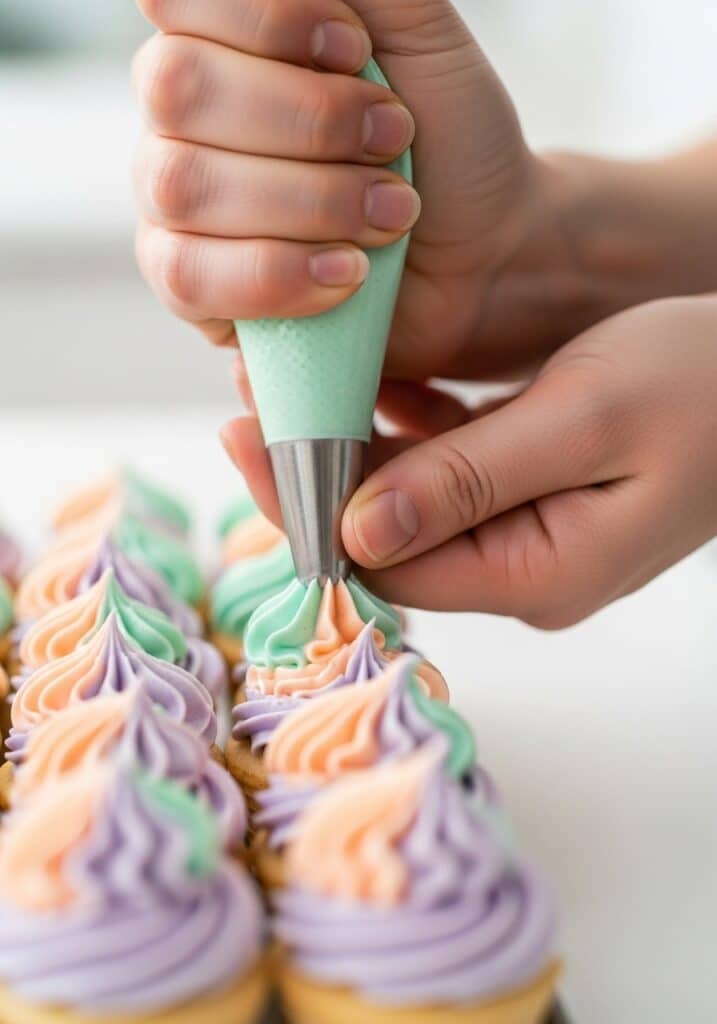
- Attach a large star tip to your piping bag.
- Fill the bag about two-thirds full with frosting.
- Starting at the center of the cupcake, pipe a spiral upward, just like soft-serve ice cream.
- Finish with a slight flick of the wrist to get that rounded top.
Additionally, top your swirl with sprinkles or mini chocolate chips for a polished look.
Need ideas for styling? Check out our ice cream cone guide for fun shapes and toppings.
Let the frosted cones rest at room temperature for 15–20 minutes. This helps the frosting set before storing or serving.
Common Problems and Solutions
Why Do Ice Cream Cone Cupcakes Get Soggy?
A frequent problem with ice cream cone cupcakes is that the cones can get soggy. This usually happens when the cupcakes sit too long before serving. Because the moist cake sits directly in the cone, the cone can soften over time.
Also, storing them in a sealed container adds moisture, which speeds up sogginess. The more humid the environment, the quicker the cones lose their crunch.
How to Keep Cupcake Cones from Getting Soggy
Thankfully, it’s easy to avoid soggy cones with a few smart tricks. Let’s go through the best ways to maintain that crisp texture.
- Cool cupcakes completely before decorating. If you frost them while warm, steam gets trapped and makes the cones soft.
- Wait to add frosting until right before serving. This reduces the time the frosting sits on the cupcake. Less time = less moisture soak.
- Store them uncovered at room temperature. Airtight containers trap moisture. Instead, use a cupcake carrier with airflow or keep them on a tray.
- Use a dry, cool space. If your kitchen gets humid, try storing the cupcakes in a room with better airflow.
- Serve the same day for best results. While you can make them ahead, they stay crunchiest within the first 6–8 hours.
If you’re making these treats for a party, plan your timing. Bake the cupcakes first, then add the frosting and decorations just before guests arrive. That way, your cone cupcakes stay crispy and fresh.
For a visual look at cone types, check out our ice cream cone guide, which covers different styles and textures.
In case you need to store leftovers, place the cupcakes in the fridge uncovered for a short time. Although the cones may soften slightly, the flavor will still be great.
Creative Variations You’ll Love
Fun Twists on Ice Cream Cone Cupcakes
Once you’ve mastered the classic version of ice cream cone cupcakes, it’s time to get creative. Whether you want to match a party theme or surprise your guests, there are plenty of fun ways to change up the look and flavor.
Here are a few exciting ideas to try:
- Use chocolate or red velvet cake batter for a bold flavor shift. You can even swirl two batters together for a marble effect.
- Dye your frosting with gel food coloring to match birthday themes, holiday colors, or team spirit.
- Add candy toppings like crushed Oreos, mini M&Ms, or rainbow sprinkles for extra crunch and color.
- Dip the tops in melted chocolate for a shell-like finish. Let it harden before adding more decorations.
- Use flavored extracts in the frosting—like peppermint, lemon, or almond—for a tasty twist.
- Fill the cones halfway with mini marshmallows or chocolate chips before adding the batter. This adds a gooey surprise inside.
- Pipe a double swirl using two frosting colors side by side in the same bag.
As you can see, there’s no limit to how festive and fun these cupcakes can become. Just one or two small changes can turn a basic batch into a centerpiece-worthy dessert.
Want a spring-inspired version? Try pastel colors with lemon cake and light pink frosting. For Halloween, go with chocolate cake, orange frosting, and candy eyes.
For even more visual impact, consider serving the cupcakes on a decorated cone stand. That way, each one stands tall and proud like a real ice cream cone.
Need flavor pairing tips? Don’t miss our Lemon Cupcakes for delicious frosting combos and inspiration.

How to Store and Transport Cupcake Cones
Best Ways to Store Ice Cream Cone Cupcakes
After baking and decorating your ice cream cone cupcakes, you’ll want to keep them fresh and stable. These fun desserts can soften or shift if not stored correctly.
Here are some tips to help you store them the right way:
- Let the cupcakes cool completely before storing. Warm cupcakes create steam, which leads to soggy cones.
- Avoid airtight containers unless the cones are fully cooled and unfrosted. Trapped moisture can ruin the crispness.
- If possible, store them uncovered in a dry, cool spot for up to 6 hours before serving.
- For longer storage, place the cupcakes in the refrigerator without a cover for 12–24 hours. This keeps the frosting firm without making the cones too soft.
- Add decorations later, especially if using whipped toppings or fresh fruit. These ingredients break down faster in storage.
Additionally, always keep them upright. Use your cupcake pan or a custom cupcake carrier with tall slots to hold the cones steady.
Want to store them overnight? Loosely tent them with foil and place them in the fridge. The cones may soften slightly, but the flavor stays delicious.
How to Transport Ice Cream Cone Cupcakes Without Ruining Them
Planning to bring ice cream cone cupcakes to a party or picnic? You’ll need a few smart tricks to keep them looking picture-perfect.
- Use a deep cupcake carrier or baking pan to hold the cones upright. Add foil balls around the base if needed.
- Avoid stacking anything on top of the frosting. One lid press can ruin your swirl.
- If traveling in warm weather, keep the cupcakes cool with an insulated bag or cooler.
- Add toppings at the last minute to keep colors bright and textures crisp.
- Drive carefully, placing the carrier flat in your trunk or on the floor—not the seat.
For added security, place small squares of parchment or foam between the cones to prevent tipping. That way, even a bumpy ride won’t damage your display.
Looking for travel-friendly dessert ideas? Try our Mini Ice Cream Cones — easy to transport and just as fun to serve.
Can You Freeze Ice Cream Cone Cupcakes?
Is It Safe to Freeze Cone Cupcakes?
If you’re planning ahead, you might wonder if ice cream cone cupcakes can be frozen. The answer is yes—but with a few conditions. While the cupcake portion freezes well, the cone and frosting require extra care.
Freezing works best when the cupcakes are unfrosted. That way, you avoid texture changes in the frosting and limit cone softening.
How to Freeze Ice Cream Cone Cupcakes Properly
Here’s a step-by-step guide to freezing them without ruining taste or texture:
- Bake the cupcakes inside the cones as usual. Let them cool completely.
- Do not frost them yet. Frosting doesn’t freeze well and can crack or become grainy when thawed.
- Wrap each cone in plastic wrap. Next, arrange them in a single layer inside an airtight container.
- Label and date the container. You’ll want to use them within 30 days for best quality.
- Freeze the container flat. Stacking or tilting may cause the cones to crack.
Also, store the cupcakes away from foods with strong smells. Because cones are porous, they can absorb smells easily while in the freezer.
When you’re ready to serve, follow these tips for the best results.
How to Thaw and Decorate Frozen Cone Cupcakes
- Remove cupcakes from the freezer and unwrap them. Place them upright on a tray at room temperature.
- Let them thaw for about 1 hour. You can speed it up slightly with a fan, but don’t microwave them.
- Check cone texture before frosting. If the cones are soft, let them air dry for another 10–15 minutes.
- Frost and decorate only after thawing. This keeps the swirl looking fresh and prevents melting.
Want to try other frozen party treats? Don’t miss our Strawberry Cheesecake Ice Cream for another refreshing, crowd-pleasing option.
Although freezing works in a pinch, serving your cone cupcakes fresh will always give you the crispiest results.
Final Tips and Serving Suggestions
Make Your Ice Cream Cone Cupcakes Party-Ready
Before you serve your ice cream cone cupcakes, take a few moments to get them party-perfect. These small touches can make a big difference, especially if you’re hosting or gifting them.
First, serve them on a flat tray or cupcake stand that holds each cone upright. This not only makes them easier to grab but also shows off the fun swirl on top.
If you’re displaying them outdoors, keep them shaded and cool. Direct sun can melt frosting quickly, especially in warm weather.
Next, add final toppings just before serving. A few extra sprinkles, mini chocolate chips, or edible glitter can give your cupcakes that polished, festive look.
Want to keep things tidy? Offer napkins, mini holders, or cupcake sleeves so guests can eat them without sticky fingers.
When and Where to Serve Cone Cupcakes
These treats work well for almost any occasion. They’re fun, creative, and easy to eat—no forks or plates required.
Here are some great times to serve them:
- Birthday parties – Kids love the look, and cleanup is simple.
- School events – They’re portable, pre-portioned, and allergen-flexible.
- Picnics or cookouts – No refrigeration needed if you serve them quickly.
- Themed holidays – Use colored frosting and toppings to match the celebration.
- Bake sales or fundraisers – Their unique style draws attention and sells fast.
Also, if you want to wow your guests, try placing each cone in a mini ice cream cone holder. You can even label them with cute signs to match your event.
Looking for more birthday-ready desserts? Don’t miss our Lemon Cupcakes—bright, flavorful, and made to impress.
Above all, serve your cupcakes with confidence. They look great, taste amazing, and everyone—from kids to adults—will love them.
Frequently Asked Questions
Baking and Storage
Can I bake cupcakes in an ice cream cone?
Yes, you can! Ice cream cone cupcakes are made by pouring cupcake batter directly into flat-bottomed cones and baking them upright in a cupcake pan. This method turns the cone into both a baking vessel and an edible holder, making them perfect for parties and fun desserts.
Do ice cream cone cupcakes get soggy?
Sometimes they do, especially if stored in a sealed container or frosted while still warm. Moisture from the cupcake or frosting can soften the cone over time. To keep them crisp, let cupcakes cool completely and store them uncovered if possible.
How to keep cupcake cones from getting soggy?
To prevent sogginess, cool cupcakes fully before frosting and store them in a dry, open environment. You should also avoid airtight containers and serve them within 6–8 hours for the best texture.
Can you freeze ice cream cone cupcakes?
Yes, but it’s best to freeze them unfrosted. Let them cool, wrap each cone in plastic wrap, and store in a flat, airtight container. When ready to use, thaw at room temperature and frost just before serving to maintain cone structure and frosting texture.
Transport and Baking Questions
How to transport cone cupcakes?
For safe transport, set the cone cupcakes in a cupcake pan, deep box, or cone stand. Use foil balls or paper towel rolls to keep them upright. Also, avoid stacking or covering the frosting, and keep them cool during travel.
Can you bake a cake in an ice cream cone?
Yes, you can! Ice cream cones can handle the heat of a typical oven when filled with batter. However, always use flat-bottomed cones and don’t overfill them. Fill each cone about three-quarters full to avoid overflow and ensure even baking.
Need more storage or travel tips? Don’t miss our Mini Ice Cream Cones—they’re fun, bite-sized, and perfect for on-the-go desserts.
Conclusion: Make Ice Cream Cone Cupcakes Your Go-To Treat
Ice cream cone cupcakes are more than just a fun twist—they’re the perfect mix of creativity, taste, and convenience. With their colorful frosting swirls and edible cone base, they stand out at any celebration.
They’re easy to bake, simple to decorate, and super fun to serve. Whether you’re hosting a birthday party, school event, or weekend cookout, these cone cupcakes deliver joy with every bite.
Plus, they don’t require forks, plates, or even cupcake liners. That makes cleanup faster and kid-friendly moments even more fun.
If you’re looking for a dessert that’s crowd-pleasing and totally customizable, this is it. You can play with flavors, colors, fillings, and toppings to match any occasion.
Not only are they a great baking project for beginners, but they also make a lasting impression on guests. One tray of cone cupcakes is all it takes to elevate your dessert table.
Don’t miss our Lemon Cupcakes for seasonal flavor inspiration that pairs perfectly with your cone creations.
Now that you know the step-by-step process, common pitfalls, and pro-level storage tricks—you’re ready to bake with confidence.
So go ahead—preheat that oven, grab those cones, and whip up a batch of ice cream cone cupcakes everyone will love!
PrintThe Best Ice Cream Cone Cupcakes – Fun To Make, Easy To Serve!

Fun and festive ice cream cone cupcakes topped with creamy frosting and sprinkles—perfect for birthdays, parties, and kid-friendly treats.
- Prep Time: 45
- Cook Time: 30
- Total Time: 1 hour 15 minutes
- Yield: 12 –15 cupcakes 1x
- Category: Dessert
- Cuisine: American
Ingredients
Cupcakes:
12 flat bottomed ice cream cones
¼ cup (56 g) unsalted butter, softened
¼ cup (60 ml) neutral oil (vegetable, canola, or avocado)
¾ cup (150 g) granulated sugar
2 large eggs (room temperature preferred)
1 ½ tsp vanilla extract
1 ½ cups (185 g) all-purpose flour
1 ½ tsp baking powder
¼ tsp salt
⅔ cup (160 ml) buttermilk
3 tbsp colored sprinkles or quinns (optional – avoid nonpareils)
Cream Cheese Frosting:
½ cup (113 g) unsalted butter, softened
8 oz (226 g) brick-style cream cheese, softened
¼ tsp salt
1 tsp vanilla extract
4 cups (500 g) powdered sugar
¼ cup (33 g) cocoa powder (optional, for chocolate frosting)
1–3 tbsp heavy cream or milk (if needed)
Additional sprinkles for topping (optional)
Instructions
Preheat your oven to 350°F (175°C). Place the cones upright in a cupcake pan. Use foil to stabilize them if needed.
Make the batter: In a bowl, beat butter, oil, and sugar until creamy. Add eggs one at a time, then stir in vanilla.
Mix dry ingredients in another bowl: flour, baking powder, and salt.
Alternate adding flour mixture and buttermilk to the wet ingredients. Stir in sprinkles if using. Do not overmix.
Fill each cone ¾ full with batter. Use an ice cream scoop to portion evenly.
Bake for 20–23 minutes or until a toothpick comes out clean. Let cool completely before decorating.
Notes
Don’t overfill cones—stop at the first ridge.
Frost only after cupcakes are completely cool.
Use jimmies or quinns; avoid nonpareils as they bleed.
Serve same day for best cone texture.
Nutrition facts are estimates and may vary based on ingredients used, portion sizes, and preparation methods
Nutrition
- Serving Size: 1ice cream cone cupcake
- Calories: 325kcal
- Sugar: 37g
- Sodium: 183mg
- Fat: 12g
- Saturated Fat: 8g
- Trans Fat: 1g
- Carbohydrates: 50g
- Fiber: 1g
- Protein: 5g
- Cholesterol: 44mg
Keywords: Cream cheese, ice cream cones, cocoa powder, buttermilk, sour cream, egg whites, heavy cream, food coloring,chip cake mix, can frosting,Funfetti cake mix, Box cake mix, cherries, vanilla frosting, cake batter
Let’s connect! Follow me for more Joylicious Recipes: Facebook, Instagram, Pinterest