Easy Mini Ice Cream Cones You Can Make At Home
Mini ice cream cones are the perfect sweet, bite-sized dessert that never fails to impress. These tiny treats are not just adorable—they’re also ideal for parties, kids’ snacks, or when you’re craving a fun and guilt-free indulgence. In this complete guide, you’ll explore everything about mini ice cream cones, from how to make them at home to understanding their ingredients, different types, and all the creative ways to serve them.
Whether you’re planning a summer get-together or adding flair to your dessert tray, these little cones offer big flavor in a small package. From galaxy-themed creations to simple homemade classics, we’ll walk you through everything you need to know.
Check out our vegan ice cream recipe for a dairy-free filling option that pairs perfectly with your homemade cones.
Let’s dive into why these trending desserts are stealing the spotlight.
What Are Mini Ice Cream Cones and Why Everyone Loves Them
The Rise of Mini Desserts in American Kitchens
Mini desserts have taken center stage in recent years. From cupcakes to tartlets, downsized sweets are more popular than ever—and mini ice cream cones are no exception. They’re easy to hold, beautiful to present, and fun to customize with colorful toppings or fillings.
As more people aim for moderation and mindful eating, smaller portions have become more desirable. Mini cones offer just enough indulgence without overwhelming your plate (or waistline). Plus, they’re an Instagram-worthy treat at everything from weddings to backyard BBQs.
Benefits of Mini Ice Cream Cones for Parties and Portion Control
So what makes these tiny cones so lovable? Here’s why they’re winning over both kids and adults:
- Perfectly sized portions that satisfy without overdoing it
- Ideal for kids, since they fit neatly in small hands
- Highly customizable with different fillings, colors, and decorations
- Great for events, offering bite-sized servings that are mess-free
- Fun to serve, especially when paired with themed toppings or creative displays
Looking for inspiration? Try our fruit kabobs guide for another colorful party idea to serve alongside these cones.
Coming up next: the exact ingredients you’ll need to make mini cones from scratch at home.
Ingredients Needed for Homemade Mini Ice Cream Cones
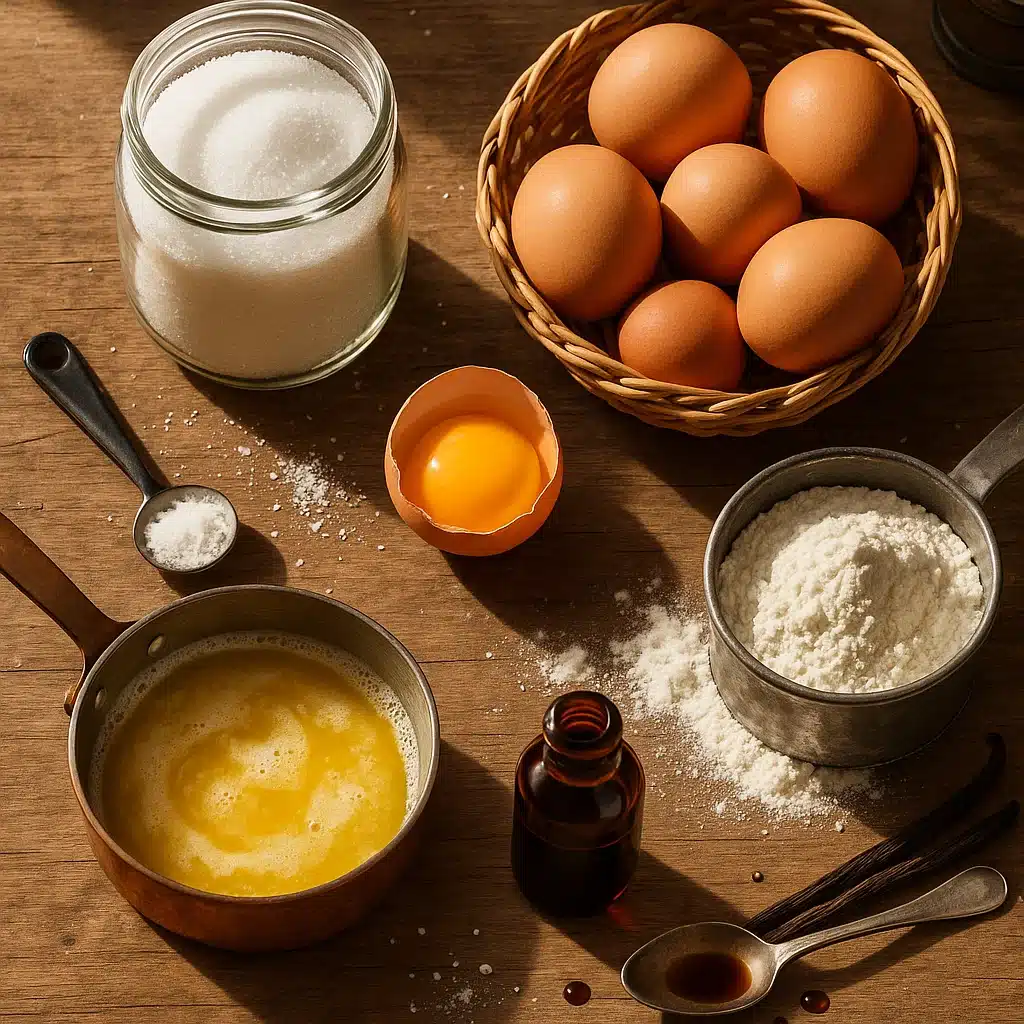
Classic Cone Batter: Exact Ingredients You’ll Need
Making your own mini ice cream cones at home starts with a simple, tried-and-true batter. You don’t need any fancy ingredients or equipment—just a few pantry staples and a bit of patience.
Here’s the exact list you’ll need to prepare about 16 to 20 mini cones:
| Ingredient | Amount |
|---|---|
| Granulated sugar | 1 2/3 cups |
| Egg whites (large eggs) | 3/4 cup (about 5 whites) |
| Salt | 1 pinch |
| Unsalted butter, melted | 1 cup (8 ounces) |
| All-purpose flour | 1 cup |
| Pure vanilla extract | 1/2 teaspoon |
Pro Tip: Always use high-quality butter and real vanilla extract for the best flavor. The better your ingredients, the tastier your cones.
These ingredients come together to form a thin, pourable batter that bakes into golden, flexible cookies—perfect for rolling into cone shapes.
Don’t miss our easy condensed milk bread recipe for another delicious, beginner-friendly project using pantry staples.
Understanding Each Ingredient’s Role in Cone Texture and Taste
It’s not just about throwing everything in a bowl. Each ingredient plays a key role in how your mini ice cream cones turn out:
- Sugar adds sweetness and crispness. The high sugar content helps the cones brown nicely in the oven.
- Egg whites bind the batter and give it structure without weighing it down.
- Butter provides richness and flavor while helping the cones firm up as they cool.
- Flour adds body. All-purpose flour works great for crispy yet bendable results.
- Salt enhances flavor and balances the sweetness.
- Vanilla adds a subtle aromatic sweetness to the finished cones.
Once everything is mixed, you’ll be spreading and baking the batter into thin circles. And don’t worry—we’ll walk you through that process next.
Looking for a savory twist? Discover our cheesy corn fritters recipe for a crisp, snackable option to serve alongside dessert.
How to Make Mini Ice Cream Cones Step-by-Step
Preparing the Cone Batter the Right Way
Now that you have your ingredients ready, it’s time to bring them together into a smooth, pourable batter. Here’s how to do it:
- Set your oven to 375°F and adjust the rack so it’s centered inside.
- In a large mixing bowl, whisk together the granulated sugar, egg whites, and a pinch of salt. You’re not looking for peaks—just make sure the sugar dissolves fully.
- Slowly whisk in the melted butter, followed by the flour and vanilla extract. The mixture should be silky and slightly thick but still easy to spread.
Tip: Don’t overmix—stop whisking once everything is combined. Overworking the batter can lead to tough cones.
You now have the perfect base for baking golden, flexible discs that’ll soon become crispy mini cones.
Check out our easy strawberry cheesecake ice cream for a dreamy filling that’s just right for these cones.
Shaping and Baking Perfect Mini Cones at Home
This part is where timing matters most. Be ready to move quickly once the cookies are out of the oven. Here’s a breakdown of the steps:
- Line a baking sheet with parchment paper or a silicone baking mat.
- Spoon 2 tablespoons of batter onto the sheet, spacing them well apart (you can bake up to four at a time).
- Gently spread each dollop into a 4-inch circle using the back of a spoon or offset spatula.
- Bake for 8–10 minutes, or until the cookies are a light golden brown on the edges.
Once baked, immediately shape them into cones using a cone mold or pizzelle roller. If they’re too hot, use a clean kitchen towel to handle the cookie safely.
If you’re working solo, bake only 4 at a time—they set fast.
Pro Tip: If a cookie cools too much and hardens, pop it back in the oven for 15 seconds to soften again.
Looking for variety? Learn more about galaxy-themed cone fillings that are as fun to look at as they are to eat.
Tips for Rolling the Cones Without Cracks
- Work quickly but gently. The cookies should still be warm and flexible when shaping.
- Avoid overbaking, or the cookies will become too brittle to roll.
- Use a cone mold or substitute with a rolled-up piece of foil or even the end of a whisk handle.
- Let the cones cool completely before filling to help them hold their shape and stay crisp.
- To prevent dripping, place a tiny mini marshmallow at the tip of the cone before adding ice cream.
You can also form bowls instead by draping warm cookies over an upside-down muffin tin—ideal for sundae-style desserts.
Don’t miss our lemon-blueberry sheet cake if you’re prepping a full dessert spread for a crowd.
Alternative Uses: Mini Ice Cream Bowls and Edible Shells
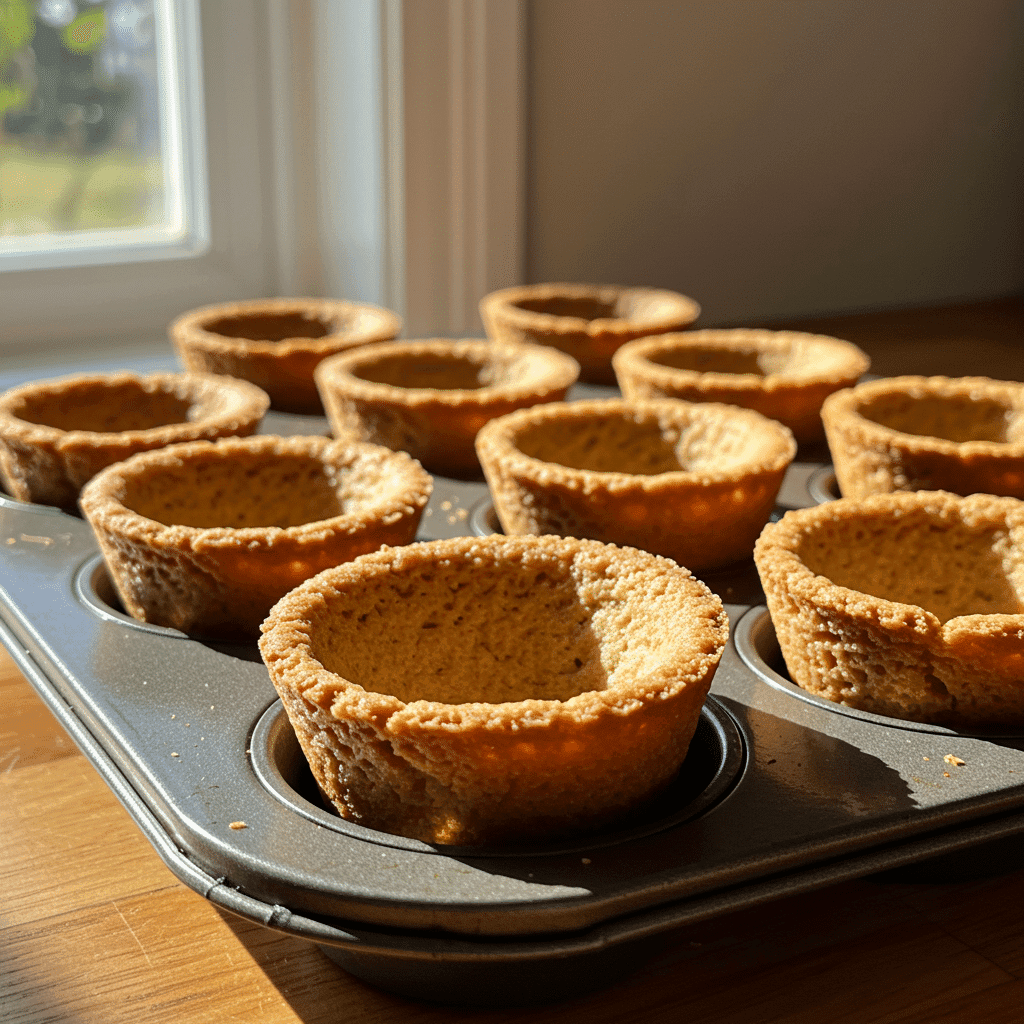
Using Muffin Tins for Bowl-Shaped Cookies
If rolling cones feels a bit tricky, don’t worry—you’ve got options. While traditional cones are great, you can use the same batter to make mini ice cream bowls instead. These edible bowls are just as crunchy and flavorful, and they’re a lot easier to shape.
To get started, bake the batter as usual. Simply drop 2 tablespoons of batter onto a lined baking sheet, spread into circles, and bake for 8 to 10 minutes until the edges turn golden. Then, right after baking, carefully drape each cookie over the bottom of an inverted muffin tin. Because the cookies are still warm and flexible, they will mold easily into a bowl shape.
After a few minutes of cooling, you’ll have perfectly shaped bowls that can hold scoops of ice cream, fruit, or even whipped cream.
Want to add a tropical twist? Try pairing these bowls with our mini pineapple upside-down cheesecakes for a creative dessert board.
Fun Ways to Serve Dessert Without a Cone
While mini ice cream cones are a classic, there’s no reason you can’t think outside the cone. In fact, there are plenty of clever ways to use this batter beyond just rolling it into the traditional shape. Here are some fun options:
- Make dessert tacos: Once the cookies are baked, fold them into taco shapes while still warm. Then, fill them with whipped cream, fruit, or ice cream.
- Create cookie sandwiches: For something more filling, bake slightly thicker circles and sandwich ice cream between two layers.
- Add flair to dessert shots: Cut the warm cookies into triangles and use them as crunchy toppers on pudding cups or mousse shooters.
- Serve ice cream nachos: Break cooled cones into bite-sized pieces, then drizzle with chocolate, caramel, or even peanut butter sauce.
Because these alternatives use the same basic batter, you won’t need to adjust the recipe. However, they let you serve dessert in totally unexpected ways, which can be a fun surprise for guests.
Looking for a crowd-pleaser? Pair your edible bowls with our cookie dough bites recipe to build a DIY dessert bar.
Ultimately, these cone alternatives are a great way to shake things up. Whether you’re hosting a party, prepping for a bake sale, or just getting creative in the kitchen, these options give you more room to play.
Best Flours for Ice Cream Cones: A Quick Guide
All-Purpose vs. Cake Flour: Which Is Better for Cones?
When it comes to making the perfect mini ice cream cones, choosing the right flour can make a big difference. While the classic recipe uses all-purpose flour, some bakers wonder if other types—like cake flour or gluten-free blends—might produce better results.
So, what’s the difference?
- All-purpose flour has a moderate protein content. This makes it perfect for creating cones that are crisp, slightly chewy, and strong enough to hold their shape.
- Cake flour, on the other hand, contains less protein. As a result, it yields a softer, more delicate texture, which isn’t ideal for cones that need to hold ice cream without bending or cracking.
If you’re sticking with traditional cones, all-purpose flour is your best bet. However, if you’re experimenting with textures or creating thin cookie shells instead of firm cones, you can try blending cake flour into the mix.
Still exploring baking ideas? Don’t miss our lemon cupcakes recipe—another dessert that benefits from choosing the right flour.
Gluten-Free Options for Allergy-Friendly Ice Cream Cones
Thankfully, there are also plenty of gluten-free options available for those with allergies or dietary preferences. But before swapping out ingredients, it’s important to understand how these flours behave in baking.
Here are a few great alternatives:
- Gluten-free all-purpose baking blends: Many of these are 1-to-1 replacements that already include xanthan gum to help mimic the stretch and binding properties of wheat flour.
- Rice flour: This option adds a slightly sandy texture but can work if blended with other starches.
- Almond flour: Although it adds a nutty flavor, it lacks the structure needed to roll cones unless combined with binders like egg whites or tapioca starch.
- Oat flour: A great choice for earthy, wholesome flavor, but it must be used with care to prevent crumbly results.
When using gluten-free flour, it’s crucial to let the batter rest for 10–15 minutes before baking. This helps the ingredients hydrate and improves the final texture.
Additionally, if you’re preparing cones for a party where allergens are a concern, label them clearly so everyone knows they’re safe to enjoy.
Looking for allergy-friendly options? Try our creamy coconut curry meatballs for a delicious dairy- and gluten-free dinner before dessert.
Ultimately, choosing the right flour for your mini ice cream cones depends on texture, taste, and dietary needs. Whether you go with traditional all-purpose or explore gluten-free blends, you can still achieve crisp, golden cones with the right technique.
Types of Ice Cream Cones Explained
Sugar Cones, Cake Cones, and Waffle Cones: What’s the Difference?
If you’ve ever stood in front of an ice cream counter wondering which cone to choose, you’re not alone. There are three main types of cones—and each has its own unique texture, taste, and ideal use. When it comes to making mini ice cream cones at home, understanding the differences can help you pick the best style for your recipe.
Let’s break it down:
- Sugar cones are firm, crisp, and have a rich caramel-like flavor. Because they’re sturdier, they work exceptionally well for both full-size and mini ice cream cones. Plus, their pointed tip gives them that classic cone look.
- Also known as wafer cones, cake cones are delicate in texture, lightweight, and usually have a light golden hue. They have a more subtle flavor and a softer crunch. While they’re easy to eat, they tend to absorb moisture faster, which can be tricky for homemade mini cones.
- Waffle cones are the most flavorful, with a buttery, deep texture. Their wide opening and distinct pattern make them perfect for scooping in large servings—but also ideal for oversized mini cones or dessert bowls.
Want more dessert inspiration? Check out our chocolate chip cookie dough brownie bombs to pair with any cone style.
As you can see, each cone type brings something different to the table. When it comes to mini portions, sugar cones are often the preferred choice because of their durability and firm shape. However, if you’re crafting fun flavors or unique presentations, experimenting with all three could lead to delicious discoveries.
Which Type Is Best for Mini Treats?
So, which cone should you choose when making mini versions?
- For structure and presentation: Sugar cones hold their shape the best and offer a crisp, satisfying bite.
- For lightness and mild flavor: Cake cones are kid-friendly and less sweet, but they may become soggy if not eaten quickly.
- For artisan-style treats: Waffle cones offer deep flavor and look beautiful when shaped into small bowls or tacos.
Although you’re working with a homemade batter, you can mimic any of these styles by adjusting baking time, sweetness level, and thickness of your cookie circles.
For another nostalgic treat, don’t miss our s’mores cookies recipe—a great topping idea for mini cones too!
Ultimately, the type of cone you choose depends on your dessert goals. Whether you’re aiming for crunch, softness, or rich flavor, there’s a mini cone style to match.
Flavor and Topping Ideas for Mini Ice Cream Cones
Homemade Ice Cream Flavors That Pair Best with Mini Cones
While store-bought ice cream works just fine, making your own allows you to control flavor, texture, and sweetness. Even better, homemade ice cream pairs beautifully with mini cones, especially when you keep the batch sizes small and focused on freshness.
Here are a few winning flavor combos that go perfectly with homemade cones:
- Vanilla bean: Simple yet elegant, this flavor complements the buttery crunch of a mini cone without overpowering it.
- Strawberry cheesecake: Rich, creamy, and slightly tangy—this flavor feels like a full dessert in one bite.
- Mint chocolate chip: Refreshing and sweet, mint adds a pop of flavor while chocolate chips offer texture.
- Lemon curd swirl: A zingy twist that’s perfect for summer. Pair with fresh berries for a colorful cone.
- Cookies and cream: Chunky, creamy, and super kid-friendly—always a crowd-pleaser.
Want something different? Try our mango sorbet recipe for a fruity, dairy-free option that chills perfectly in mini cones.
If you’re short on time, soft-serve or no-churn ice cream recipes are also ideal. They freeze fast and scoop well, making them perfect for quick gatherings or last-minute cravings.
Fun Fillings: From Fruit to Sprinkles to Chocolate Tips
What really sets mini ice cream cones apart is how fun they are to decorate. Because of their size, you can get creative with fillings and toppings that wouldn’t work well on larger cones.
Here are some playful and eye-catching ideas:
- Chocolate-dipped tips: Before filling, dip the inside of each cone tip in melted chocolate and let it set. Not only does it prevent leaks, but it also adds a rich bite at the end.
- Mini marshmallow base: Pop a tiny marshmallow into the bottom of the cone before adding ice cream. It stops drips and adds a chewy surprise.
- Drizzles and sprinkles: Add caramel, hot fudge, or berry sauces over each scoop, then top with rainbow sprinkles or chopped nuts.
- Candy coatings: Dip cone rims in melted chocolate, then roll in crushed candies, coconut flakes, or colorful cereal.
- Fruit pops: Add a single blueberry, cherry, or raspberry on top of each mini scoop for a fresh finish.
These small details go a long way—especially when you’re making a batch for kids, parties, or themed events.
Looking to go even more over the top? Pair with our lemon cream cheese dump cake for a dessert buffet that no one will forget.
Remember, because the cones are small, they’re a perfect canvas for layering textures and flavors. You don’t need much to make a big impression.
Galaxy-Inspired Ice Cream Cones: Ingredients & Trends
What’s in a Galaxy Ice Cream Cone?
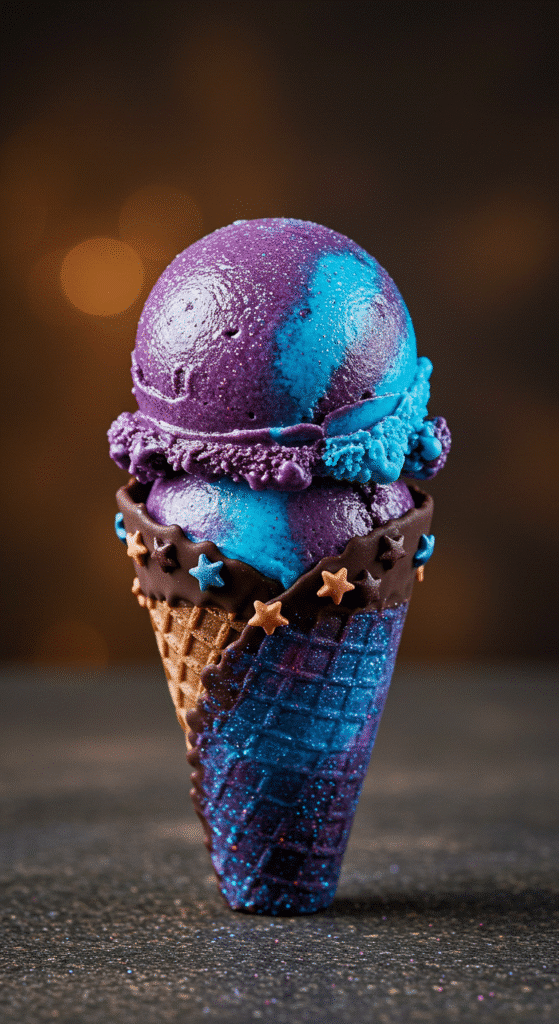
Over the past few years, galaxy ice cream cones have become a massive hit on social media. Thanks to their shimmering swirls, bold colors, and cosmic toppings, they bring a touch of magic to any dessert table. But what exactly goes into making a galaxy-style cone?
Typically, a galaxy cone involves:
- Brightly colored ice cream: Think purple, blue, teal, and pink—swirled together to mimic a galactic sky.
- Edible glitter or luster dust: This adds a beautiful shimmer that reflects light, making the cones sparkle with each bite.
- Colored cone batter: Some bakers tint their cone batter using food-grade gel coloring to match the ice cream theme.
- Cosmic toppings: Star-shaped sprinkles, crushed rock candy, and even edible gold leaf can add the finishing touch.
These elements work together to transform a simple mini cone into a photo-worthy treat. And because of their smaller size, mini ice cream cones are ideal for showing off layered colors and shimmering finishes without being too overwhelming.
For a beautiful flavor pairing, try our berries and cream recipe as a base for galaxy-style scoops.
Although these cones look complex, they’re surprisingly easy to make with the right ingredients and a little patience.
How to Create the Shimmering Look at Home
If you’re ready to give your cones a cosmic upgrade, here’s how to do it without needing professional equipment:
- Start with multiple colors: Divide your ice cream base into 3–4 bowls. Add gel food coloring to each (navy, fuchsia, aqua, and lavender work well).
- Swirl, don’t mix: Layer the colored scoops next to each other and lightly swirl them with a spatula once or twice—avoid fully mixing to preserve the vibrant patterns. Too much mixing will dull the effect.
- Add shimmer: Lightly dust the top of each scoop with edible glitter or pearl dust before freezing.
- Decorate the cone: Dip the rim in melted white chocolate, then roll in black sugar or star sprinkles for contrast.
- Freeze briefly: Pop cones into the freezer for 10–15 minutes to set the design before serving.
Want to round out your galaxy theme? Don’t miss our cherry Garcia ice cream—perfect for layering rich reds and purples into your swirls.
Creating galaxy mini cones is a great way to get kids involved or impress guests with minimal effort. They look intricate but come together quickly once your ingredients are prepped.
Storage and Serving Ideas for Mini Ice Cream Cones
How to Store Homemade Cones Without Losing Crunch
Once you’ve put time and effort into making the perfect mini ice cream cones, the last thing you want is for them to go soft or stale. Fortunately, with the right storage method, you can keep them crisp and ready to serve for several days.
Here’s how:
- Let cones cool completely before storing. Even a little leftover heat can cause condensation, which softens the texture.
- Place the cones in a sealed container, using parchment paper to line the bottom for added protection. Keep layers separated with parchment to prevent sticking.
- For extra freshness, consider including a moisture-absorbing silica pack inside the storage container.
- Avoid refrigeration, as the cold, humid air can quickly make cones soggy. Room temperature storage is ideal.
- Store cones separately from pungent foods, as they tend to soak up surrounding smells much like bread does.
If stored properly, your mini cones can last up to 5 days while maintaining their crunch and flavor. However, the fresher, the better—especially if you’re planning to dip or fill them in advance.
Want another make-ahead treat? Try our banana chocolate chip cookies that also store beautifully and pair well with homemade ice cream.
Party-Ready Presentation Tips for Kids and Adults
Serving mini ice cream cones is all about presentation. Because of their size and charm, they make a beautiful centerpiece on any dessert table. Here are some creative ideas for showcasing them at your next event:
- Cone stands: Use a cardboard cone holder, mini cupcake stand, or even a foam board with holes to display them upright.
- Cone cups: Serve cones individually in clear shot glasses or paper espresso cups—perfect for parties and easy cleanup.
- Frozen displays: Pre-fill cones with scoops and place them upright in a chilled tray. Return to the freezer until right before serving.
- Cone bars: Set up a DIY mini cone bar with different ice creams, sprinkles, crushed cookies, and syrups. Guests can build their own.
- Label for fun: Use chalkboard signs or printable tags to name your ice cream flavors or cone styles—especially helpful for dietary-friendly options.
These presentation tricks don’t just look good—they help keep the cones from melting too fast or tipping over during the party.
For a fun display centerpiece, check out our watermelon cake recipe—a visually stunning fruit-based dessert that pairs great with mini cones.
By prepping smart and serving creatively, you’ll make your homemade mini ice cream cones the highlight of any gathering—whether it’s a kids’ birthday party or a backyard barbecue.
FAQs About Mini Ice Cream Cones
How to make ice cream cone ingredients?
To make cone batter, you’ll need basic ingredients: sugar, egg whites, melted butter, all-purpose flour, a pinch of salt, and vanilla extract. Whisk until smooth, then bake into thin circles and shape while warm.
How to make mini ice cream cones?
Begin by preparing the cone batter. Spoon small circles onto a baking sheet and bake until golden. Immediately wrap the warm cookies around a cone mold. Let them cool fully before filling with ice cream.
Which flour is used in ice cream cones?
Most recipes use all-purpose flour because it gives the right balance of crispness and flexibility. For gluten-free versions, use a 1-to-1 gluten-free baking blend.
What is the difference between ice cream cone and waffle cone?
Waffle cones are thicker and have a deep, buttery flavor with a distinct pattern. Regular ice cream cones, like cake or sugar cones, are lighter and crisper, with sugar cones being stronger and sweeter.
What are the three types of ice cream cones?
The three main types are:
– Sugar cones – firm and sweet with a pointed tip
– Cake cones – light and less sweet with a flat base
– Waffle cones – rich, large, and flavorful with a wide opening
What are the ingredients in the Galaxy ice cream cone?
Galaxy cones often include colorful swirled ice cream, edible glitter, and candy toppings. The cone itself may be dyed or dipped in chocolate and decorated with sprinkles or edible stars for a space-inspired look.
Conclusion: Tiny Cones, Big Flavor
Mini ice cream cones may be small in size, but they deliver big on fun, flavor, and creativity. Whether you’re baking a batch from scratch, experimenting with galaxy-inspired toppings, or setting up a cone bar for your next party, these tiny treats offer endless possibilities.
By learning the differences between cone types, choosing the right flour, and mastering baking and shaping techniques, you’ll have everything you need to craft beautiful, delicious mini cones at home. Plus, with simple ingredients and flexible serving options, this recipe is ideal for beginners, families, and dessert lovers alike.
So the next time you’re in the mood for something sweet—but not too big—skip the store-bought cones. Make your own. Your guests (and your taste buds) will thank you.
- Looking for more sweet inspiration?
- Check out our vegan ice cream recipe
- Discover great ideas like our fruit kabobs guide
- Don’t miss our mango sorbet recipe
- Try this banana chocolate chip cookies recipe
Mini Ice Cream Cones

Mini ice cream cones made from a crisp, buttery batter—perfect for parties, kids, or fun treats. Easy to bake, shape, and fill with your favorite ice cream.
- Prep Time: 5 mins
- Cook Time: 48 mins
- Total Time: 53 minutes
- Yield: 24 servings 1x
- Category: Desserts
Ingredients
1 2/3 cups granulated sugar
3/4 cup egg whites (about 5 large eggs)
1 pinch salt
1 cup melted unsalted butter
1 cup all-purpose flour
1/2 tsp pure vanilla extract
Instructions
Set oven to 375°F and center the rack.
In a bowl, whisk sugar, egg whites, and salt until sugar dissolves.
Add melted butter, flour, and vanilla. Mix until smooth.
Drop 2 tbsp batter on lined sheet, spread into 4″ circles.
Bake 8–10 minutes.
Quickly shape into cones over a mold or muffin tin.
Let cool before filling.
Notes
Only bake 4 at a time to avoid hardening before shaping.
A marshmallow in the bottom helps catch drips.
Return hardened cookies to oven for 10 seconds to soften again.
Nutrition facts are estimates and may vary based on ingredients used, portion sizes, and preparation methods
Nutrition
- Serving Size: 24 servings
- Calories: 145
- Sugar: 14g
- Sodium: 19mg
- Fat: 8g
- Saturated Fat: 5g
- Unsaturated Fat: 3g
- Carbohydrates: 18g
- Fiber: 0g
- Protein: 1g
- Cholesterol: 20mg
Keywords: Mini Ice Cream Cones, Ice Cream Cone, egg whites, salt, unsalted butter, all-purpose flour, pure vanilla extract
Let’s connect! Follow me for more Joylicious Recipes: Facebook, Instagram, Pinterest