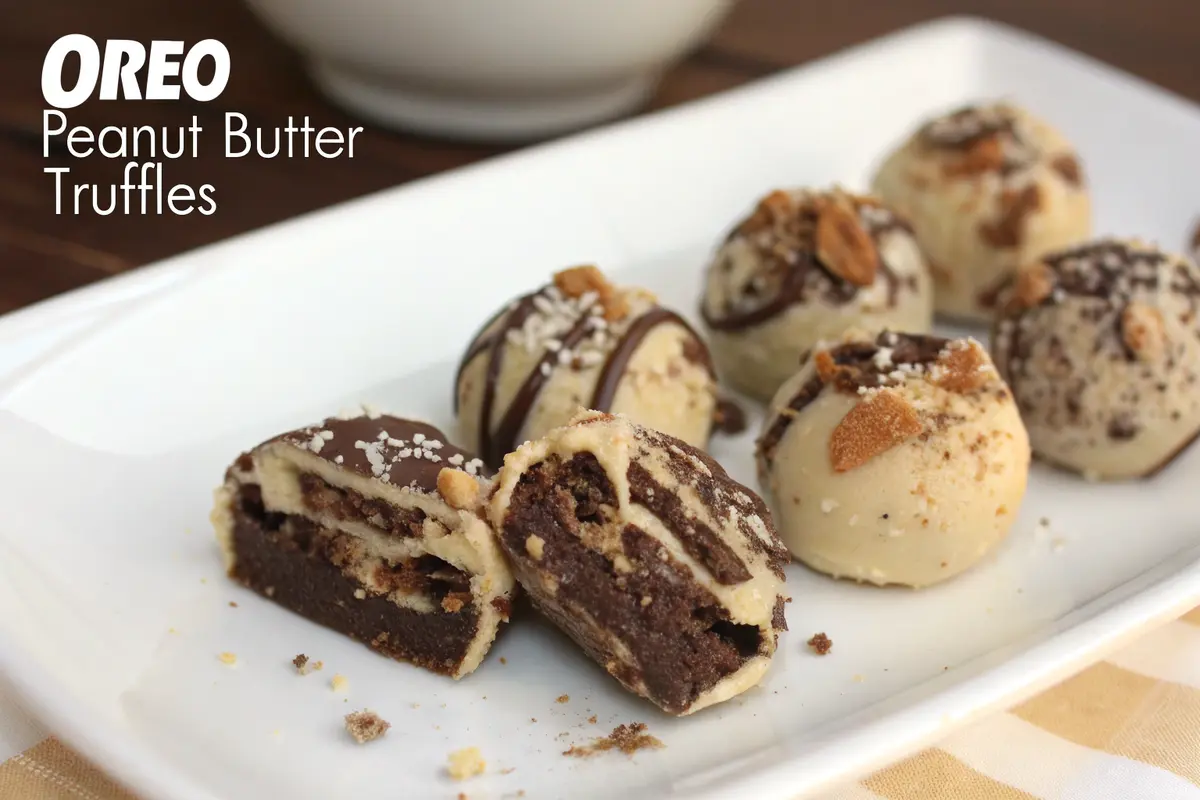
Indulge in Sweet Perfection: Oreo Peanut Butter Truffles
A No-Bake Chocolate Dream
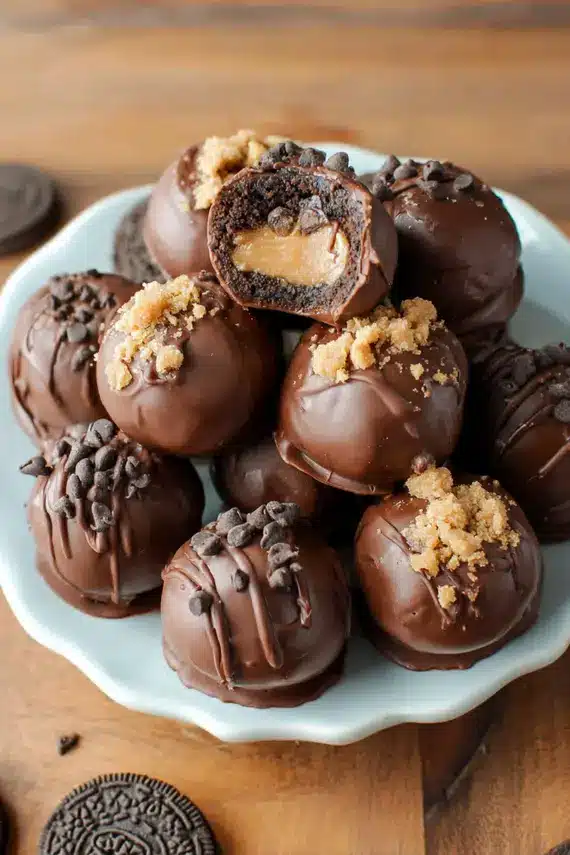
Oreo peanut butter truffles combine the irresistible flavors of chocolate cookies and creamy peanut butter in one delectable bite-sized treat. These no-bake delights feature a fudgy interior with the perfect balance of sweetness and that signature Oreo crunch, all enrobed in a shell of rich chocolate that creates a satisfying snap with each bite. “For another delightful no-bake treat that’s perfect for special occasions, try this pistachio cake recipe that offers a wonderful balance of nutty flavor and moist texture.”
What makes these truffles truly special is their versatility and simplicity. Perfect for holiday cookie platters, homemade gifts, or midnight snacking sessions, these bite-sized treasures require minimal effort yet deliver maximum flavor impact. Whether you’re entertaining guests or simply treating yourself, these oreo peanut butter truffles will become your new favorite way to satisfy chocolate cravings without turning on the oven.
Everything You’ll Need for Decadent Chocolate Truffles
Core Ingredients for Oreo Peanut Butter Magic
Creating these irresistible oreo desserts starts with gathering quality ingredients. The beauty of these peanut butter bites lies in their simplicity, requiring just a handful of pantry staples to create something truly special. “The homemade biscuit recipe also relies on simple pantry ingredients to create something incredibly satisfying and versatile.”
| Ingredient | Quantity | Notes |
|---|---|---|
| Oreo cookies | 1 package (36 cookies) | Regular flavor recommended, but Double Stuf works too |
| Creamy peanut butter | 1/2 cup | Commercial brands work best (avoid natural varieties that separate) |
| Unsalted butter | 1/4 cup | Melted |
| Semi-sweet chocolate chips | 1 cup | For coating |
| Cream cheese | 4 ounces | Softened (optional for creamier texture) |
| Vanilla extract | 1 teaspoon | Enhances flavor |
| Powdered sugar | 1/4 cup | For added sweetness and structure (optional) |
| White chocolate chips | 1/2 cup | For drizzling (optional) |
| Coconut oil | 1 tablespoon | To thin chocolate for easier coating |
| Chopped peanuts | 1/4 cup | For garnish (optional) |
| Oreo cookie crumbs | 2 tablespoons | Reserved from crushing, for garnish (optional) |
| Sea salt flakes | 1 pinch | For garnish (optional) |
Equipment Essentials for Perfect Truffles
Having the right tools ready will make the truffle-making process smoother and more enjoyable:
- Food processor or heavy-duty zip-top bag with rolling pin (for crushing cookies)
- Large mixing bowl
- Measuring cups and spoons
- Cookie scoop or tablespoon measure
- Baking sheets
- Parchment paper or silicone baking mats
- Microwave-safe bowls for melting chocolate
- Forks or truffle dipping tools
- Cooling rack (optional)
- Piping bag or plastic bag with corner snipped (for drizzling)
Creating Perfect Chocolate Truffle Bites: Step-by-Step Guide
Preparation and Mixing Phase
Follow these detailed instructions to create perfectly balanced oreo peanut butter truffles with the ideal texture and flavor:
- Prepare the Oreo crumbs: Place all 36 Oreo cookies into a food processor and pulse until they form fine crumbs with no large pieces remaining. If you don’t have a food processor, place cookies in a heavy-duty zip-top bag and crush with a rolling pin until finely ground. Reserve 2 tablespoons of crumbs for garnishing if desired.
- Combine crushed Oreos, peanut butter, and melted butter in a bowl: Transfer the Oreo crumbs to a large mixing bowl. Add the creamy peanut butter and melted butter. If using the cream cheese for a creamier texture, add it now along with the vanilla extract.
- Mix until well blended: Using a sturdy spatula or clean hands, work the ingredients together until fully incorporated. The mixture should be moist enough to hold together when pressed but not overly sticky or dry. If the mixture seems too dry, add an additional 1-2 tablespoons of peanut butter. If too wet, add 1-2 tablespoons of powdered sugar to help bind.
- Form mixture into 1-inch balls: Using a cookie scoop or measuring tablespoon, portion the mixture into consistent amounts. Roll each portion between your palms to create smooth, uniform balls. For clean truffle-making, lightly coat your hands with a tiny bit of coconut oil to prevent sticking.
- Place on a parchment sheet: Arrange the formed balls on a baking sheet lined with parchment paper or a silicone baking mat, leaving a small space between each truffle to prevent sticking together.
- Freeze for 20 minutes: Place the baking sheet in the freezer for at least 20 minutes to firm up the truffles. This crucial step ensures they’ll hold their shape during the chocolate dipping process. You can freeze them for up to 1 hour if your kitchen is particularly warm.
Chocolate Coating and Final Touches
- Prepare the chocolate coating: While the truffles are chilling, place the semi-sweet chocolate chips and 1 tablespoon of coconut oil in a microwave-safe bowl. Microwave in 30-second intervals at 50% power, stirring well between each interval, until completely melted and smooth. Be careful not to overheat as chocolate can seize.
- Melt chocolate chips and coat the truffles: Working with 3-4 truffles at a time (keeping the rest in the freezer), use a fork or truffle dipper to dip each ball into the melted chocolate. Gently tap the fork against the bowl’s edge to remove excess chocolate and create a smooth, even coating.
- Return to parchment and garnish (optional): Place the chocolate-coated truffles back onto the parchment-lined baking sheet. While the chocolate is still wet, sprinkle with reserved Oreo crumbs, chopped peanuts, or a tiny pinch of sea salt if desired.
- Let set before serving: Allow the truffles to set at room temperature for about 30 minutes, or place in the refrigerator for 10-15 minutes for faster setting. For the decorative drizzle, melt white chocolate chips and drizzle over the set truffles using a piping bag or plastic bag with the corner snipped.
- Final setting and presentation: Allow the drizzle to set completely before serving or storing. This typically takes 15-20 minutes at room temperature or 5-10 minutes in the refrigerator. Arrange on a serving platter or in decorative paper cups for a professional presentation.

Expert Truffle-Making Secrets for Flawless Results
Ingredient Selection and Preparation Techniques
These specialized tips will help you create perfect oreo peanut butter truffles with professional results every time. “If you enjoy these carefully crafted no-bake treats, you might also appreciate the attention to detail in our blackberry basil ricotta pizza that combines unexpected flavors in delightful ways.”
- Cookie selection matters: While regular Oreos work perfectly, try Golden Oreos or specialty flavors like mint or peanut butter-filled Oreos for exciting flavor variations in your no-bake sweets.
- Peanut butter consistency is key: Commercial, shelf-stable peanut butter brands like Jif or Skippy work best as they contain emulsifiers that help maintain the proper texture. Natural peanut butter can separate and make the mixture too oily.
- Temperature control for dipping: If your melted chocolate starts to thicken while dipping, place the bowl over a pot of warm (not simmering) water to maintain the ideal consistency without overheating.
- Double-coating technique: For an extra-special finish, allow the first chocolate coating to set completely, then dip the truffles a second time for a thicker, more professional-looking shell.
- Perfect chocolate texture: Adding a small amount of coconut oil or shortening to your melting chocolate creates a smoother, more fluid coating that sets with a beautiful shine and clean snap.
- Make-ahead strategy: These chocolate truffles actually improve with a day of rest in the refrigerator as the flavors meld and develop, making them perfect for advance preparation.
- Size consistency: Using a small cookie scoop (1-tablespoon size) ensures all your truffles are uniform, which helps them look more professional and ensures even setting times.
Troubleshooting Common Truffle Problems
- Too crumbly mixture: If your truffle mixture won’t hold together, add 1-2 additional tablespoons of peanut butter and mix thoroughly.
- Too sticky mixture: If the mixture sticks excessively to your hands, refrigerate for 15-20 minutes before rolling, or dust your hands lightly with powdered sugar.
- Chocolate seizing: If your chocolate becomes grainy or stiff, it may have come into contact with water or been overheated. Start over with fresh chocolate and be careful with temperature control.
- Uneven coating: Make sure truffles are thoroughly chilled before dipping and tap off excess chocolate gently but firmly for a smooth, even layer.
Keeping Your Delectable Treats Fresh and Flavorful
Optimal Storage Methods for Maximum Shelf Life
Proper storage is crucial for maintaining the quality of your oreo peanut butter truffles, ensuring they stay fresh and delicious whether you’re enjoying them throughout the week or preparing them in advance for a special occasion. “For helpful food preservation techniques beyond desserts, our crispy chicken sandwich recipe includes excellent tips for keeping components fresh and maintaining that perfect texture.”
- Refrigerator storage: Place cooled and fully set truffles in an airtight container, separating layers with parchment or wax paper to prevent sticking. These will keep beautifully for up to 2 weeks in the refrigerator, though the chocolate coating may develop a slight condensation when first removed from the cold.
- Room temperature serving: For the best flavor and texture experience, remove truffles from the refrigerator about 15-20 minutes before serving. This allows the centers to soften slightly while the chocolate coating remains intact.
- Freezer storage for longer keeping: These truffles freeze exceptionally well for up to 3 months. Place them in a single layer on a baking sheet until frozen solid (about 1-2 hours), then transfer to a freezer-safe container or heavy-duty freezer bag, adding parchment between layers.
- Thawing frozen truffles: Always thaw frozen truffles in the refrigerator overnight rather than at room temperature to prevent condensation from forming on the chocolate coating, which can lead to a cloudy appearance.
- Gift packaging: If giving as gifts, package cooled truffles in decorative boxes lined with parchment paper. They’ll stay fresh at cool room temperature for 3-4 days, making them perfect for holiday gifting.
- Protecting flavor integrity: Store truffles away from strong-smelling foods as the chocolate can absorb odors, even in sealed containers. This is especially important during refrigerator storage.
Maintaining Optimal Texture and Appearance
- Preventing chocolate bloom: Temperature fluctuations can cause the cocoa butter in chocolate to separate, creating a whitish film known as “bloom.” While still safe to eat, this affects appearance. Store at a consistent temperature to prevent this.
- Keeping garnishes fresh: If you’ve garnished with chopped nuts, these can become soft over time in the refrigerator. For the best texture, add delicate garnishes just before serving if possible.
- Long-term planning: The truffle mixture (without chocolate coating) can be frozen in a block for up to 3 months. Thaw in the refrigerator, then form into balls and continue with the recipe when ready to serve.
Creative Twists on the Classic Oreo Peanut Butter Combination
Flavor Adaptations for Every Palate
The beauty of these no-bake chocolate truffles lies in their adaptability. Here are some inspired variations to customize these oreo desserts to your taste preferences and occasions:
- Double Chocolate Intensity: Replace regular Oreos with Chocolate Creme Oreos and add 2 tablespoons of cocoa powder to the mixture. Coat with dark chocolate (70% cocoa) for an ultra-rich chocolate experience. Finish with a dusting of cocoa powder for an elegant touch.
- White Chocolate Berry Bliss: Use Golden Oreos instead of regular, add 2 tablespoons of freeze-dried strawberry or raspberry powder to the mixture, and coat in white chocolate. The tangy berry notes provide a beautiful contrast to the sweet white chocolate.
- Nutty Caramel Dream: Add 3 tablespoons of caramel sauce to the base mixture along with 1/4 cup finely chopped toasted almonds. After coating in milk chocolate, drizzle with additional caramel and sprinkle with sea salt flakes for a sophisticated sweet-salty combination.
- Cookie Butter Variation: Replace half the peanut butter with cookie butter spread (such as Biscoff) for a unique spiced flavor profile that complements the Oreo base beautifully. Coat in milk chocolate and garnish with crushed speculoos cookies.
- Mint Chocolate Chip: Use Mint Oreos as your base and add 1/4 teaspoon mint extract to the mixture. Coat in dark chocolate and sprinkle with finely chopped mint chocolate pieces or crushed candy canes for a refreshing dessert perfect for holiday entertaining.
- Coffee Lovers’ Delight: Add 1 tablespoon of instant espresso powder dissolved in 1 teaspoon of hot water to the mixture. Coat in dark chocolate and dust with a mixture of cocoa powder and espresso powder for a sophisticated mocha truffle.
Texture Variations and Presentation Ideas
- Truffle Cups: Instead of rolling into balls, press the mixture into mini muffin liners, create a small well in the center, and fill with a dot of jelly or caramel before covering with chocolate.
- Layered Bark: Press the truffle mixture into a parchment-lined 8×8 pan, freeze until firm, then pour melted chocolate over the top. Sprinkle with toppings and cut into squares when set.
- Truffle Pops: Insert lollipop sticks into formed truffle balls before freezing, then dip in chocolate for an elegant dessert presentation perfect for parties.
- Cookie Sandwiches: Form the mixture into thin discs, freeze until firm, then sandwich between two small cookies for a textural contrast delight.
Delightful Ways to Enjoy Your Homemade Chocolate Truffles
Elegant Presentation for Special Occasions
These versatile oreo peanut butter truffles can be presented in numerous ways to enhance any dining experience from casual family treats to elegant entertaining. Pairing these rich treats with a bright, bold southwest salad creates a perfect contrast of flavors and textures for a complete meal experience.
- Dessert Charcuterie Board: Arrange truffles alongside fresh berries, small cookies, candied nuts, and chocolate-dipped fruits for an impressive dessert board that encourages sampling and conversation.
- Holiday Cookie Box: Include these truffles in your holiday cookie assortment for a standout addition among traditional baked goods. Their rich texture and appearance make them a focal point of any cookie collection.
- Café-Style Dessert Plate: Serve two truffles on a small plate with a flourish of raspberry or caramel sauce, a few fresh berries, and a sprinkle of powdered sugar for an upscale dessert café experience at home.
- Celebration Tower: Arrange truffles in ascending circles on a tiered stand, alternating with fresh flowers or greenery for a stunning centerpiece at showers, graduations, or anniversary celebrations.
- Individual Gift Packaging: Place truffles in small decorative boxes lined with colorful tissue paper for thoughtful homemade gifts during the holiday season or as wedding favors.
- Ice Cream Enhancement: Serve chopped truffles as a premium topping for vanilla ice cream with a drizzle of hot fudge for an indulgent sundae experience that combines creamy and crunchy textures.
Pairing Suggestions for Complete Enjoyment
- Coffee and Tea Pairings: These rich truffles pair beautifully with a strong espresso or cappuccino. The bitterness of the coffee balances the sweetness of the truffles. For tea drinkers, try a robust chai or Earl Grey.
- Fruit Accompaniments: Serve alongside fresh strawberries, raspberries, or sliced pears to provide a refreshing contrast to the richness of the truffles.
- Complementary Flavors: A small dish of salted nuts like pistachios or cashews creates a delightful taste contrast when served alongside these sweet treats.
- Kid-Friendly Celebration: For children’s parties, serve truffles with small cups of cold milk or fruit smoothies for a balanced treat experience.
Answers to Your Most Common Truffle Questions
Ingredient and Technique Clarifications
Can I use crunchy peanut butter instead of creamy?
Yes, you can use crunchy peanut butter if you prefer a bit more texture in your oreo peanut butter truffles. The small peanut pieces will add an interesting crunch to the finished product. Just be aware that the mixture may be slightly more difficult to form into smooth balls, and you might need to add an extra tablespoon or two of peanut butter to achieve the right consistency since the peanut pieces displace some of the binding spread.
Why did my chocolate coating crack after setting?
Chocolate coating cracks typically occur when there’s a significant temperature difference between the cold truffle centers and the warm chocolate coating. To prevent this, allow the truffles to warm up slightly (about 5 minutes) after removing from the freezer before dipping them in chocolate. Additionally, adding a small amount of coconut oil or shortening (1-2 teaspoons per cup) to your melting chocolate creates a more flexible coating that’s less prone to cracking.
Can I make these truffles without a food processor?
Absolutely! While a food processor makes quick work of crushing the Oreos, you can achieve the same result by placing the cookies in a heavy-duty zip-top bag and crushing them with a rolling pin or the bottom of a heavy pan. For the finest texture, crush in small batches and take your time to ensure no large pieces remain. The finer the crumb, the smoother your truffle texture will be.
Adaptation and Dietary Considerations
How can I make these dairy-free?
To create dairy-free oreo peanut butter truffles, use dairy-free Oreos (original Oreos are actually dairy-free, but always check packaging as formulations change), replace the butter with coconut oil, and use dairy-free chocolate chips for coating. Many brands like Enjoy Life and Equal Exchange offer excellent dairy-free chocolate options that melt beautifully. Skip the cream cheese option or use a dairy-free cream cheese alternative if you want that added creaminess.
Can I reduce the sugar content in these truffles?
While these are decidedly a sweet treat, you can reduce the sugar content by using reduced-sugar peanut butter and dark chocolate with a high cocoa percentage (70% or higher) for coating. You can also skip any additional powdered sugar in the filling. The Oreos themselves contain sugar that can’t be reduced without changing the recipe significantly, but these modifications will create a less sweet version that lets the chocolate and peanut butter flavors shine more prominently.
Are there alternatives to peanut butter for allergies?
Yes, these truffles work well with alternative nut or seed butters. Almond butter, cashew butter, or sunflower seed butter make excellent substitutions for those with peanut allergies. Sun butter (sunflower seed butter) is particularly good for school settings where nut-free policies are in place. Just note that each alternative butter has a slightly different consistency, so you may need to adjust the amount slightly to achieve the right texture for rolling.
Final Thoughts on These Irresistible No-Bake Treats
Why These Truffles Will Become a Family Favorite
Oreo peanut butter truffles represent the perfect balance of simplicity and indulgence in homemade desserts. Their no-bake nature makes them accessible to cooks of all skill levels, while their rich, decadent flavor profile delivers a gourmet experience that belies their easy preparation. “If you’re looking for other simple recipes with impressive results, our vegan mayo recipe offers the same kind of kitchen magic—transforming basic ingredients into something special with minimal effort.”
What makes these chocolate truffles truly special is their versatility. They can be adapted to countless flavor variations, fit seamlessly into any occasion from casual family movie nights to elegant holiday gatherings, and make thoughtful homemade gifts that recipients genuinely treasure. The combination of crunchy Oreo cookies with creamy peanut butter creates a textural masterpiece that satisfies deep chocolate cravings while providing that perfect hint of salt to balance the sweetness.
As you enjoy creating these delectable treats in your kitchen, remember that the joy of cooking often lies in the little moments—the satisfaction of rolling perfect truffle balls, the artistic drizzling of chocolate, and ultimately, the smiles of appreciation from those who sample your creations. Whether you follow the classic recipe or venture into creative variations, these oreo peanut butter truffles are sure to become a beloved addition to your dessert repertoire, requested time and again by family and friends.
PrintOreo Peanut Butter Truffles

- Indulge in these irresistible no-bake Oreo peanut butter truffles with a rich chocolate coating.
- Perfectly balanced sweetness with a hint of salt, these bite-sized treats are ideal for gift-giving or special occasions.
- Easy to make with just a handful of ingredients!
- Prep Time: 30
- Total Time: 30 minutes
- Yield: 36 truffles 1x
- Category: Dessert
- Method: No-Bake
- Cuisine: American
Ingredients
- 1 package (36) Oreo cookies
- 1/2 cup creamy peanut butter
- 1/4 cup unsalted butter, melted
- 1 cup semi-sweet chocolate chips
- 4 ounces cream cheese, softened (optional)
- 1 teaspoon vanilla extract
- 1 tablespoon coconut oil
- 1/4 cup chopped peanuts (optional, for garnish)
- 2 tablespoons reserved Oreo cookie crumbs (optional, for garnish)
Instructions
- Place Oreo cookies in a food processor and pulse until they form fine crumbs.
- Transfer cookie crumbs to a large mixing bowl and add peanut butter and melted butter.
- Add cream cheese and vanilla extract if using.
- Mix until well blended and the mixture holds together when pressed.
- Use a tablespoon or cookie scoop to portion the mixture, then roll into 1-inch balls.
- Place balls on a baking sheet lined with parchment paper.
- Freeze for 20 minutes until firm.
- Combine chocolate chips and coconut oil in a microwave-safe bowl and melt in 30-second intervals, stirring between each.
- Dip each truffle ball into the melted chocolate, tapping off excess.
- Place dipped truffles back on parchment paper and immediately sprinkle with optional garnishes if desired.
- Allow chocolate to set completely before serving or storing.
Notes
- For best results, keep refrigerated and bring to room temperature 15 minutes before serving.
- Use commercial peanut butter brands (like Jif or Skippy) rather than natural peanut butter for better texture.
- These truffles freeze beautifully for up to 3 months in an airtight container.
- Nutrition facts are estimates and may vary based on ingredients used, portion sizes, and preparation methods.
Nutrition
- Serving Size: 1 truffle
- Calories: 148
- Sugar: 12
- Sodium: 85
- Fat: 9
- Saturated Fat: 4
- Unsaturated Fat: 4
- Carbohydrates: 16
- Fiber: 1
- Protein: 2
- Cholesterol: 8
Keywords: oreo peanut butter truffles, oreo desserts, peanut butter bites, no-bake sweets, chocolate truffles
Let’s connect! Follow me for more Joylicious Recipes: Facebook, Instagram, Pinterest