Indulge in Creamy No Bake Mini Peanut Butter Cheesecakes
A Perfect Bite-Sized Delight
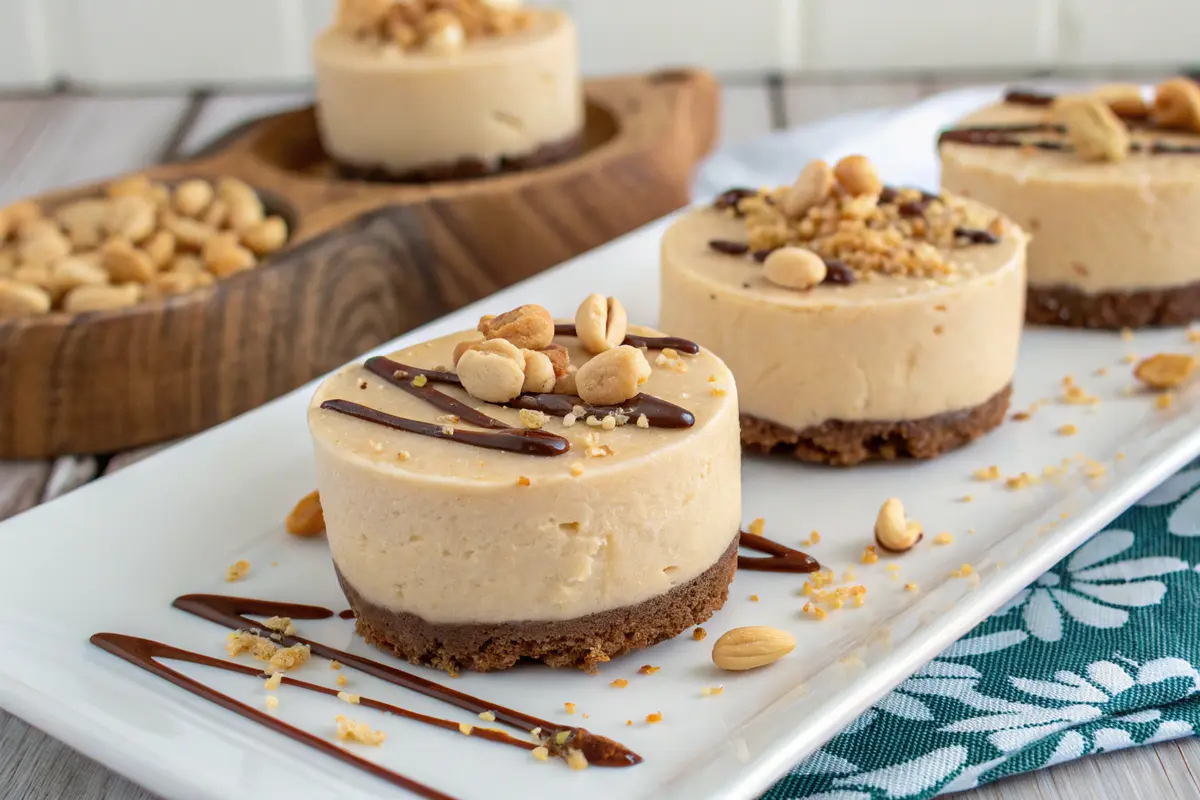
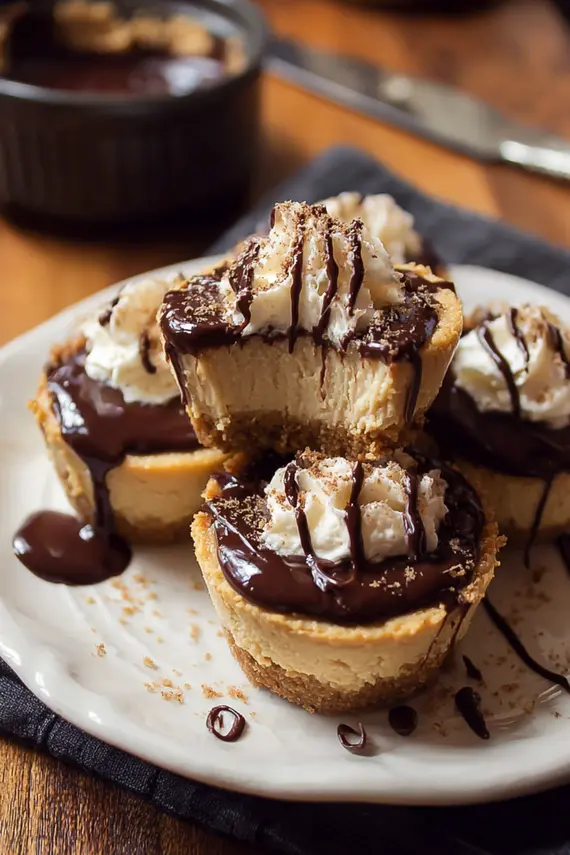
no bake mini peanut butter cheesecakes combine the rich, nutty flavor of peanut butter with the creamy tang of cheesecake in a perfectly portioned treat. These delectable bites feature a buttery graham cracker crust topped with a velvety smooth peanut butter cheesecake filling that melts in your mouth with each bite. “The mini ice cream cones recipe uses a similar individual-serving approach that makes these perfect for parties.”
These adorable mini cheesecakes are ideal for potlucks, family gatherings, or whenever you need a quick dessert that looks impressive. Their individual serving size makes them perfect for portion control while still satisfying your sweet tooth. Plus, since they’re no-bake, you can whip them up even during hot summer months without turning on your oven.
Simple Ingredients That Create Magic Together
Everything You Need For Creamy Perfection
“The pumpkin cheesecake uses similar cream cheese base techniques that create that perfect silky texture we’re aiming for in these mini treats.”
| Main Ingredients | Amount |
|---|---|
| Creamy peanut butter | 1 cup |
| Cream cheese, softened | 8 oz |
| Powdered sugar | 1/2 cup |
| Vanilla extract | 1 tbsp |
| Mini graham cracker crusts | 12 |
| Melted chocolate (optional) | 1/4 cup |
Optional Enhancements
| Flavor Boosters | Amount |
|---|---|
| Honey or maple syrup | 2 tbsp |
| Sea salt | 1/4 tsp |
| Ground cinnamon | 1/2 tsp |
| Texture Additions | Amount |
|---|---|
| Chopped roasted peanuts | 1/4 cup |
| Mini chocolate chips | 1/4 cup |
| Crushed peanut butter cookies | 1/4 cup |
| Topping Options | Amount |
|---|---|
| Whipped cream | 1/2 cup |
| Caramel sauce | 1/4 cup |
| Peanut butter chips, melted | 1/4 cup |
| Fresh berries | 1 cup |
Creating Your Perfect Peanut Butter Cheesecake Bites
Effortless Preparation Steps
Follow these simple steps to create these delicious no-bake treats:
- Before beginning, allow the cream cheese to soften at room temperature for 30-45 minutes. This ensures a smooth, lump-free filling. You’ll know it’s ready when you can easily press a finger into it and leave an indentation.
- In a large bowl, combine the softened cream cheese and creamy peanut butter. Beat with an electric mixer on medium speed for 2-3 minutes until fully incorporated and fluffy. The mixture should be pale tan and have a uniform texture.
- Gradually add the powdered sugar, about 2 tablespoons at a time, continuing to mix after each addition until completely incorporated. This prevents lumps and ensures a smooth texture. The mixture will become slightly thicker and sweeter.
- Pour in the vanilla extract and mix for another 30 seconds until well combined. If adding any optional flavor boosters like cinnamon or sea salt, incorporate them during this step.
- Taste the filling and adjust sweetness if needed by adding more powdered sugar, 1 tablespoon at a time. The filling should be smooth, creamy and hold its shape when scooped.
- Using a cookie scoop or spoon, carefully divide the mixture evenly among the mini graham cracker crusts, filling each to just below the rim. For a smooth top, use the back of a spoon dipped in warm water.
- If adding toppings like chopped peanuts or mini chocolate chips, sprinkle them over the filled crusts now, gently pressing them into the surface.
- Place the mini cheesecakes in the refrigerator and chill for at least 2 hours, or preferably 4 hours, until completely set. They should feel firm to the touch.
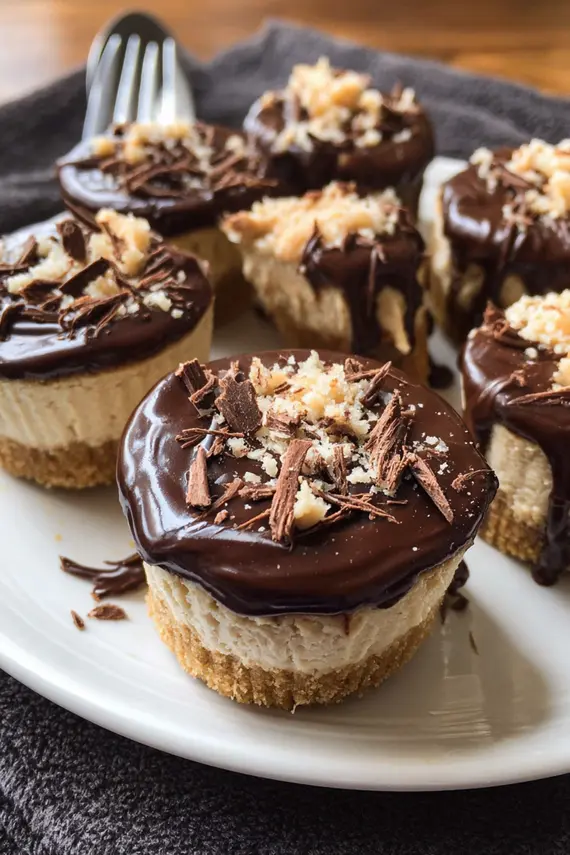
- Optional: Before serving, drizzle melted chocolate over the tops in a zigzag pattern using a fork or place in a small piping bag with the tip snipped off.
- Serve chilled directly from the refrigerator for the best texture and flavor experience. The cheesecakes should be firm yet creamy when bitten into.
Expert Tips For Cheesecake Perfection
Elevate Your Mini Cheesecakes
“The chocolate frosting recipe can be thinned slightly and used instead of melted chocolate for a richer topping option.”
- Room Temperature Ingredients: For the smoothest texture, make sure your cream cheese is fully softened before mixing. Cold cream cheese will result in a lumpy filling.
- Natural vs. Commercial: While natural peanut butter works, commercial creamy varieties like Jif or Skippy provide more consistent results and a smoother texture.
- Make-Ahead Advantage: These cheesecakes actually improve with time! Make them a day in advance for the best flavor development and firmer texture.
- Freezer-Friendly: These mini cheesecakes freeze beautifully for up to 2 months. Just thaw in the refrigerator for about 2 hours before serving.
- Piping Alternative: For a fancier presentation, transfer the filling to a piping bag fitted with a large star tip and pipe into the crusts in a decorative swirl.
- Allergy Alternative: For a peanut-free version, substitute the peanut butter with sunflower seed butter or cookie butter (speculoos).
- Balance the Sweetness: If your peanut butter is already sweetened, you may want to reduce the powdered sugar slightly to avoid an overly sweet dessert.
Keeping Your Cheesecake Bites Fresh and Delicious
Proper Storage For Maximum Enjoyment
These no bake mini peanut butter cheesecakes need to be stored properly to maintain their creamy texture and delicious flavor. For short-term storage, place the mini cheesecakes in an airtight container in the refrigerator where they’ll stay fresh for up to 5 days. If you’ve added toppings like whipped cream, they’re best consumed within 2-3 days before the toppings begin to break down.
“The savory crab cheesecake uses similar refrigeration techniques to maintain freshness, though these sweet versions can actually be frozen for longer storage.”
For freezing, place the fully set cheesecakes (without any fresh fruit or whipped cream toppings) on a baking sheet until frozen solid, about 2 hours. Then transfer to a freezer-safe container, separating layers with parchment paper. They’ll keep well for up to 2 months. To thaw, transfer to the refrigerator for at least 4 hours or overnight. Avoid thawing at room temperature as this can cause moisture to collect on the surface and affect the texture.
If you’re planning to add toppings like fresh berries or whipped cream, it’s best to add these just before serving rather than during storage to maintain the best texture and appearance.
Delicious Twists on Your Peanut Butter Mini Treats
Exciting Flavor Variations
Change up these no bake mini peanut butter cheesecakes with these creative variations:
Chocolate Peanut Butter Cup Version
Mix 1/4 cup cocoa powder into the cream cheese mixture and fold in 1/3 cup chopped peanut butter cups. Top with additional chopped peanut butter cups for a decadent chocolate-peanut butter experience that intensifies the classic flavor combination.
Banana Peanut Butter Cheesecakes
Fold 1/2 cup mashed ripe banana into the cheesecake mixture before filling the crusts. The natural sweetness and subtle fruit flavor complement the peanut butter perfectly, creating a nostalgic flavor reminiscent of childhood sandwiches.
Honey Roasted Peanut Butter Version
Replace regular peanut butter with honey roasted peanut butter and top with crushed honey roasted peanuts for added crunch and a sweet-salty flavor profile that adds dimension to each bite.
Berry Swirl Peanut Butter Cheesecakes
Prepare 1/4 cup of strawberry or raspberry jam and warm slightly. After filling the crusts, swirl a teaspoon of jam into each cheesecake and top with fresh berries before chilling. The fruity acidity balances the rich peanut butter perfectly.
Spiced Peanut Butter Cheesecakes
Add 1/2 teaspoon cinnamon, 1/4 teaspoon nutmeg, and a pinch of cardamom to the filling for a warm, aromatic version perfect for fall gatherings or holiday dessert tables. This mango habanero sauce could even be used in tiny amounts (just 1-2 teaspoons total) for an unexpected sweet-heat variation that adventurous eaters will love.
Cookie Crust Variation
Replace graham cracker crusts with crushed chocolate sandwich cookies or peanut butter cookie crusts for an extra layer of flavor that complements the creamy filling.
Presentation Ideas That Will Impress Your Guests
Serving Suggestions For Every Occasion
These no bake mini peanut butter cheesecakes are versatile enough for any occasion, from casual family desserts to elegant entertaining. Here are some creative ways to serve them:
Dessert Charcuterie Board: Arrange the mini cheesecakes on a wooden board alongside fresh berries, chocolate-dipped pretzel rods, small cookies, and individual servings of caramel sauce for dipping. This interactive dessert presentation is perfect for casual gatherings or family movie nights.
Individual Dessert Cups: Place each mini cheesecake in a clear plastic or glass dessert cup, then top with a dollop of whipped cream, a drizzle of chocolate, and a few mini chocolate chips. This elegant presentation works beautifully for dinner parties or holiday gatherings.
Dessert Trio: Serve a mini peanut butter cheesecake alongside a small scoop of vanilla ice cream and a chocolate-dipped strawberry for an impressive restaurant-style dessert plate that balances flavors and textures.
Kids’ Party Special: Top each mini cheesecake with a small animal cracker or mini peanut butter cookie standing upright as a fun decoration that children will love. Arrange on a colorful platter for maximum appeal at birthday parties or family celebrations.
Holiday Dessert Table: For seasonal gatherings, customize the toppings to match the occasion—orange and black sprinkles for Halloween, red and green drizzles for Christmas, or patriotic decorations for summer holidays. The mini size makes these perfect for dessert tables where guests want to sample multiple treats.
Portion-Controlled Indulgence: For everyday enjoyment, serve a single mini cheesecake with a small handful of fresh berries for a satisfying dessert that won’t derail healthy eating goals. The individual portions naturally help with moderation while still providing a truly satisfying dessert experience.
Common Questions About Perfect Mini Cheesecakes
Troubleshooting Your No-Bake Desserts
Why didn’t my no bake mini peanut butter cheesecakes set properly?
The most common reason for cheesecakes not setting is not chilling them long enough. These mini treats need at least 2 hours in the refrigerator, but 4 hours or overnight is ideal for the perfect texture. Another potential issue could be the ratio of ingredients—if you added extra liquid ingredients or didn’t use enough cream cheese, the mixture may remain too soft. Make sure to follow the measurements precisely for best results.
Can I use natural peanut butter for these mini cheesecakes?
Yes, you can use natural peanut butter, but you’ll need to make a few adjustments. Natural peanut butter typically separates and has a thinner consistency than commercial varieties. To use it successfully, make sure it’s well-stirred and at room temperature. You might need to add an extra 1-2 tablespoons of powdered sugar to help the filling set properly. The texture might be slightly less smooth, but the natural peanut flavor will be delicious.
How far in advance can I make these for a party?
These no bake mini peanut butter cheesecakes are perfect for make-ahead desserts! You can prepare them up to 3 days before your event and store them covered in the refrigerator. For even longer storage, they can be frozen for up to 2 months—just thaw overnight in the refrigerator before serving. If you’re adding toppings like fresh fruit, whipped cream, or drizzled chocolate, it’s best to add those shortly before serving for the freshest presentation.
Sweet Endings With Simple No-Bake Delights
Your New Go-To Dessert Recipe
No bake mini peanut butter cheesecakes offer the perfect balance of creamy, nutty indulgence in a convenient individual serving size. Whether you’re entertaining guests, preparing for a special occasion, or simply treating yourself to a well-deserved dessert, these delightful treats deliver impressive flavor with minimal effort.
“The garlic basil roasted mushrooms make an excellent savory starter before ending your meal with these sweet mini cheesecakes.”
The beauty of these no-bake cheesecakes lies in their versatility—customize them with different toppings, mix-ins, and variations to suit any taste preference or occasion. Their make-ahead convenience and freezer-friendly nature make them a perfect dessert solution for busy home cooks who don’t want to sacrifice flavor for convenience.
Next time you’re craving something sweet but don’t want to turn on the oven, remember these creamy, dreamy peanut butter cheesecake bites. With just a few simple ingredients and steps, you’ll create a dessert that looks and tastes like it came from a professional bakery.
“The garlic butter grilled shrimp would make an outstanding main course before serving these cheesecakes for dessert.”
No Bake Mini Peanut Butter Cheesecakes
- Creamy, decadent mini peanut butter cheesecakes that require no baking.
- Perfectly portioned individual treats with rich peanut butter flavor and smooth cream cheese texture.
- Ideal for parties, potlucks, or whenever you need a quick impressive dessert!
- Prep Time: 20
- Total Time: 20 minutes
- Yield: 12 mini cheesecakes 1x
- Category: Dessert
- Method: No-Bake
- Cuisine: American
Ingredients
- 1 cup creamy peanut butter
- 8 oz cream cheese, softened
- 1/2 cup powdered sugar
- 1 tbsp vanilla extract
- 12 mini graham cracker crusts
- 1/4 cup melted chocolate (optional)
- 2 tbsp honey or maple syrup (optional)
- 1/4 tsp sea salt (optional)
- 1/4 cup chopped roasted peanuts (optional, for topping)
- 1/4 cup mini chocolate chips (optional, for topping)
- 1/2 cup whipped cream (optional, for serving)
Instructions
- Allow cream cheese to soften at room temperature for 30-45 minutes.
- In a large bowl, beat softened cream cheese and peanut butter with an electric mixer on medium speed for 2-3 minutes until smooth and fluffy.
- Gradually add powdered sugar, mixing well after each addition until fully incorporated.
- Add vanilla extract and mix for another 30 seconds until well combined.
- Taste filling and adjust sweetness if needed.
- Using a cookie scoop or spoon, divide the mixture evenly among the mini graham cracker crusts.
- Smooth tops with the back of a spoon dipped in warm water.
- Add any optional toppings like chopped peanuts or chocolate chips, gently pressing into surface.
- Refrigerate for at least 2 hours, preferably 4 hours or overnight, until completely set.
- If desired, drizzle with melted chocolate before serving.
- Serve chilled for best flavor and texture.
Notes
- For the smoothest texture, make sure your cream cheese is completely softened before mixing.
- Commercial creamy peanut butter brands like Jif or Skippy work best for this recipe.
- These mini cheesecakes can be made up to 3 days ahead and stored in the refrigerator.
- For a peanut-free version, substitute sunflower seed butter or cookie butter.
- Nutrition facts are estimates and may vary based on ingredients used, portion sizes, and preparation methods.
Nutrition
- Serving Size: 1 mini cheesecake
- Calories: 245
- Sugar: 15
- Sodium: 180
- Fat: 18
- Saturated Fat: 7
- Unsaturated Fat: 9
- Carbohydrates: 19
- Fiber: 1
- Protein: 6
- Cholesterol: 25
Keywords: no bake mini peanut butter cheesecakes, mini peanut butter desserts, no bake cheesecake bites, peanut butter mini treats, easy cheesecake recipes
Let’s connect! Follow me for more Joylicious Recipes: Facebook, Instagram, Pinterest