Creating a Mouthwatering Peanut Butter Icebox Cake Everyone Will Love
The Perfect No-Bake Dessert Solution
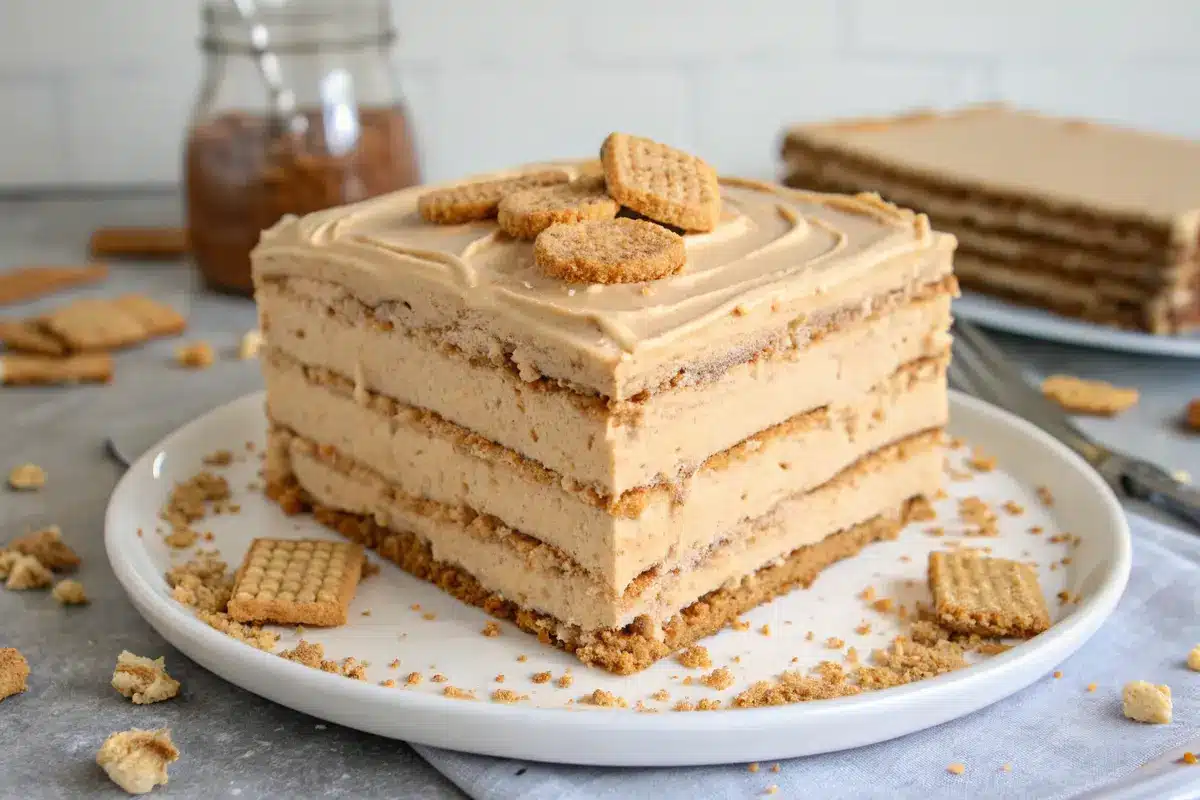
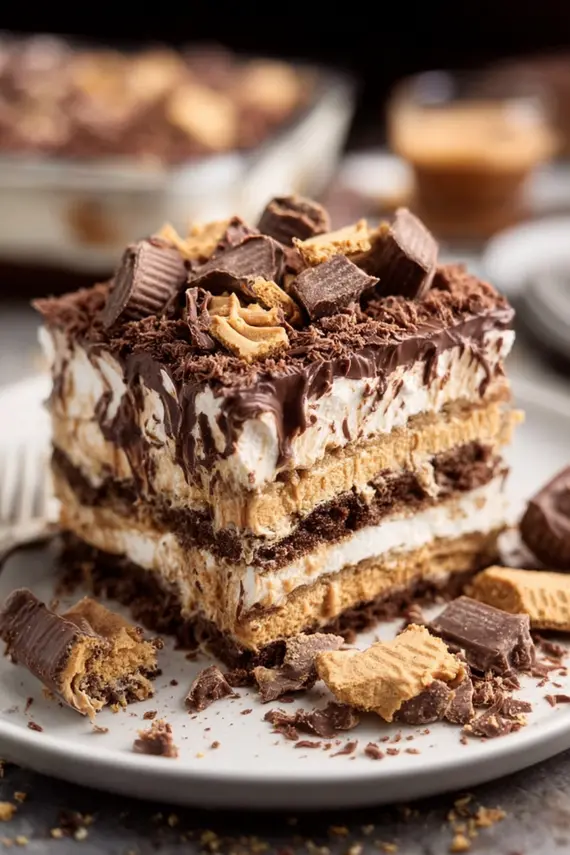
Peanut butter icebox cake combines creamy peanut butter goodness with the convenience of a no-bake dessert that’s perfect for any occasion. This delightful treat features layers of buttery graham crackers, velvety peanut butter, and rich chocolate that set to perfection in the refrigerator, creating a dessert that’s both indulgent and refreshingly cool. “The honey butter roasted carrots make a wonderful savory counterpoint when planning a full menu featuring this sweet treat.”
This heavenly dessert is ideal for summer gatherings when you don’t want to heat up the kitchen, potluck dinners where you need something that travels well, or any celebration where you want to impress guests without spending hours in the kitchen. Its make-ahead nature means you can prepare it a day before serving, making it the ultimate stress-free dessert option for busy hosts.
Everything You’ll Need for This No-Bake Delight
Gathering Your Ingredients
Before diving into this delectable creation, let’s review all the ingredients you’ll need to create the perfect peanut butter icebox cake. I’ve expanded beyond the basics to include optional enhancements that take this dessert to the next level. “The creamy vegetable chowder uses similar layering techniques to build complex flavors just like we do in this luscious dessert.”
| Ingredient Category | Ingredients |
|---|---|
| Base Ingredients | – 1 cup creamy peanut butter – 1/2 cup melted chocolate – 1/4 cup unsalted butter, melted – 1 cup powdered sugar – 1 tsp vanilla extract – 1 cup heavy cream – 2 cups crushed graham crackers |
| Flavor Enhancers | – 1/4 tsp sea salt (enhances sweetness) – 1 tsp cinnamon (adds warmth) – 2 tbsp honey or maple syrup (natural sweetener) – 1/2 tsp espresso powder (deepens chocolate flavor) |
| Texture Additions | – 1/2 cup chopped roasted peanuts (for crunch) – 1/4 cup mini chocolate chips (for pockets of chocolate) – 3 tbsp crispy rice cereal (for unexpected texture) |
| Optional Toppings | – Extra melted chocolate for drizzling – Crushed peanut butter cups – Whipped cream – Caramel sauce – Fresh banana slices (add just before serving) |
Crafting Your Irresistible Frozen Treat Step by Step
Building the Perfect Layers
Follow these detailed instructions to create a peanut butter icebox cake that will have everyone asking for seconds. Each step is designed to build texture and flavor, resulting in a perfectly balanced dessert.
- Prepare the crust base: Mix melted butter with powdered sugar in a medium bowl until smooth and well combined. The mixture should resemble wet sand that holds together when pressed. Press firmly into the bottom of a 9-inch springform pan to form an even crust layer. Use the bottom of a measuring cup to create a smooth, compact surface.
- Create the graham cracker layer: In a separate bowl, combine crushed graham crackers with the butter mixture, stirring until all cracker crumbs are evenly moistened. They should have a texture similar to damp sand. Spread this mixture evenly over the crust, pressing down gently but firmly. The more compact this layer, the better your slices will hold together when served.
- Make the peanut butter filling: In a large mixing bowl, whisk together peanut butter, melted chocolate, and vanilla until completely smooth. For best results, ensure your peanut butter is at room temperature for easier mixing. The consistency should be thick but pourable, similar to cake batter.
- Incorporate the cream: Whip the heavy cream in a separate bowl until soft peaks form, about 2-3 minutes. Gently fold the whipped cream into the peanut butter chocolate mixture using a rubber spatula. Work with a light hand, folding from bottom to top to maintain airiness. The resulting mixture should be light, fluffy, and evenly combined without streaks.
- Assemble the cake: Pour the peanut butter chocolate mixture over the graham cracker layer, spreading evenly with an offset spatula. Tap the pan gently on the counter a few times to release any air bubbles and create a smooth top. If adding any toppings, sprinkle them over now so they adhere to the still-soft filling.
- Chill until set: Cover the springform pan loosely with plastic wrap, being careful not to let it touch the surface of the cake. Refrigerate for at least 4 hours, though overnight is preferable for the most firmly set texture. The cake is properly set when it feels firm to the touch and doesn’t jiggle in the center when gently shaken.
- Serve with flair: Before serving, run a thin knife around the edge of the springform pan to loosen, then carefully remove the outer ring. Slice with a sharp knife dipped in hot water and wiped clean between cuts for the cleanest presentation. Garnish with additional toppings if desired.
Professional Secrets for Icebox Cake Success
Elevating Your No-Bake Dessert Game
Take your peanut butter icebox cake from good to extraordinary with these expert tips:
- Temperature matters: Allow cream cheese or butter to come to room temperature before mixing for a smoother texture without lumps.
- Layer strategy: For a more dramatic presentation, create alternating layers of graham crackers and filling instead of mixing them together.
- Texture enhancement: For those who prefer crunchier textures, reserve some graham cracker crumbs to sprinkle between layers or on top before chilling.
- Peanut butter selection: Use traditional creamy peanut butter rather than natural varieties that separate, as the emulsifiers in regular peanut butter help maintain the proper texture.
- Chocolate upgrade: For richer flavor, use high-quality chocolate instead of chocolate chips, which contain stabilizers that can affect melting quality.
- Flavor variations: Add a tablespoon of instant espresso powder to the chocolate layer for a mocha twist, or incorporate a teaspoon of cinnamon for warmth.
- Serving technique: For the cleanest slices, dip your knife in hot water and wipe dry between cuts. “The caprese salad requires the same careful slicing technique for beautiful presentation that we recommend for this icebox cake.”
Keeping Your Sweet Creation Fresh and Delicious
Maximizing Freshness and Flavor
Proper storage is crucial for maintaining the delicious taste and texture of your peanut butter icebox cake. Here’s everything you need to know about keeping your dessert at its best:
- Refrigerator storage: This dessert must be kept refrigerated at all times when not being served. Cover any leftover cake tightly with plastic wrap or transfer to an airtight container. Properly stored, your icebox cake will maintain its best quality for 3-4 days.
- Freezer option: For longer storage, freeze individual slices or the entire remaining cake. Wrap tightly in plastic wrap, then aluminum foil, and place in a freezer-safe container. Frozen icebox cake will retain quality for up to 1 month. Thaw overnight in the refrigerator before serving.
- Preventing texture changes: The graham cracker layers will continue to soften over time, eventually becoming cake-like. For the ideal texture balance of soft yet structured layers, serve within 48 hours of making.
- Protecting from odors: Icebox cakes can readily absorb refrigerator odors, so proper wrapping is essential. Double-wrap if storing near strong-smelling foods.
- Temperature sensitivity: Allow the cake to sit at room temperature for 5-10 minutes before serving for the best flavor and texture, but never leave out for more than 30 minutes, especially in warm weather.
Exciting Twists on the Classic Peanut Butter Icebox Cake
Creative Adaptations for Every Taste
Once you’ve mastered the basic peanut butter icebox cake, try these delicious variations to keep things interesting:
Peanut Butter and Jelly Icebox Cake – Spread a thin layer of your favorite fruit jam or preserves between the graham cracker and peanut butter layers. Strawberry or grape works particularly well, creating a nostalgic PB&J flavor profile in dessert form. The fruit adds a welcome tartness that balances the rich peanut butter.
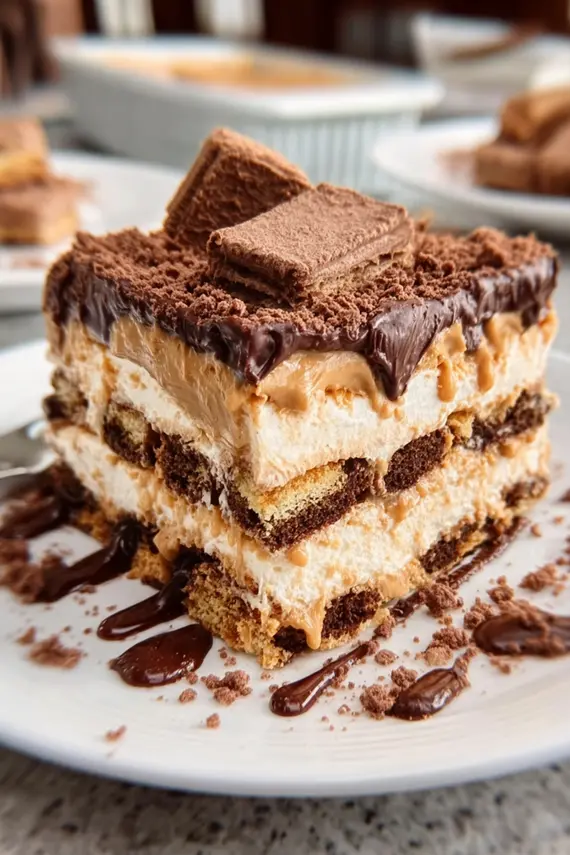
Chocolate Lover’s Peanut Butter Icebox Cake – Double the chocolate by replacing the graham crackers with chocolate wafer cookies and adding an additional layer of ganache on top. The intensified chocolate presence creates a dessert reminiscent of a peanut butter cup, but with contrasting textures.
Banana Peanut Butter Icebox Cake – Add sliced bananas between layers for a fresh twist. The bananas add moisture and natural sweetness that complements the peanut butter perfectly. This variation works best when consumed within 24 hours to maintain the freshness of the bananas.
Salted Caramel Peanut Butter Icebox Cake – Drizzle layers of salted caramel sauce between the graham cracker and peanut butter mixture. Finish with a sprinkle of flaked sea salt on top. The salty-sweet combination elevates the entire dessert to gourmet status.
Nutella Swirl Peanut Butter Icebox Cake – Warm 1/2 cup of Nutella slightly and swirl it through the peanut butter filling before pouring over the crust. This creates beautiful marbled patterns and the hazelnut chocolate flavor pairs wonderfully with peanut butter.
Healthier Greek Yogurt Peanut Butter Icebox Cake – Replace half the heavy cream with Greek yogurt for a tangier flavor profile and higher protein content. This variation has a slightly different texture but offers a less sweet option with probiotic benefits.
Presenting Your Chilled Masterpiece with Style
Impressing Your Guests with Beautiful Presentation
The way you serve your peanut butter icebox cake can elevate the entire dining experience. Here are some creative serving suggestions to make your dessert truly memorable:
For a casual family dessert, serve generous slices on colorful plates with a dusting of cocoa powder or a light sprinkle of crushed graham crackers. A simple presentation lets the flavors shine and keeps the focus on enjoying this comforting treat together.
When entertaining guests, create an elegant dessert plate by drizzling chocolate sauce in a decorative pattern on the plate before placing a slice of icebox cake in the center. Add a small dollop of freshly whipped cream and a few berries for color contrast. This creamy sauce recipe could be adapted with sweet ingredients for an amazing dessert drizzle.
For summer gatherings, pair slices with fresh seasonal fruit like strawberries or raspberries to add brightness and a touch of tartness that balances the rich, creamy filling. The color contrast also makes for a beautiful presentation.
Create a dessert bar where guests can customize their slice with various toppings like chocolate sauce, caramel drizzle, crushed peanuts, mini chocolate chips, or whipped cream. This interactive approach is perfect for celebrations.
For portion control and elegant presentation, use a round cookie cutter to create mini icebox cake cylinders, then stack them vertically with thin chocolate discs between layers for a restaurant-quality plated dessert.
To make this dessert more substantial for a dinner party finale, serve alongside a small scoop of vanilla or chocolate ice cream. The temperature contrast between the cold icebox cake and frozen ice cream creates an interesting sensory experience.
Common Questions About Creating Perfect Icebox Cakes
Troubleshooting Your No-Bake Dessert
Why is my peanut butter icebox cake not setting properly?
This usually happens when there’s too much liquid in your mixture. Make sure you’re using regular creamy peanut butter rather than natural varieties that can separate. Also, ensure your heavy cream is properly whipped to soft peaks before folding it into the peanut butter mixture. Allow at least 6-8 hours of refrigeration time for proper setting, with overnight being ideal.
Can I make this dessert ahead of time for a party?
Absolutely! In fact, this dessert benefits from being made ahead of time. You can prepare your peanut butter icebox cake 1-2 days before your event. The extra time allows the flavors to meld together beautifully, and the texture will continue to improve as the graham crackers soften slightly. Just keep it covered in the refrigerator until about 10 minutes before serving.
How can I prevent my icebox cake from becoming soggy?
While some softening of the graham crackers is expected and desirable, excessive sogginess can be prevented by ensuring your peanut butter filling is thick enough. If your mixture seems too loose after combining all ingredients, try chilling it for 30 minutes before assembling the layers. Also, avoid adding any ingredients that release excessive moisture, such as fresh fruit within the layers (save these for serving time).
Is there a dairy-free option for making this icebox cake?
Yes! You can substitute the heavy cream with full-fat coconut cream (the solid part from a can of coconut milk that’s been refrigerated overnight). For the butter in the crust, use a plant-based butter alternative. These substitutions work beautifully while maintaining the creamy texture that makes this dessert so special. Just be aware that the coconut flavor will be subtly present in the final product.
Your New Favorite Make-Ahead Dessert Solution
Why This Will Become a Regular in Your Recipe Collection
The peanut butter icebox cake is more than just a dessert—it’s a solution for busy home cooks who want to impress without spending hours in the kitchen. “The easy baked chicken recipe offers the same type of make-ahead convenience that makes this dessert such a practical choice for entertaining.”
What makes this dessert truly special is its perfect balance of rich peanut butter flavor, satisfying chocolate notes, and varying textures from creamy filling to slightly crunchy graham layers. The make-ahead nature means you can focus on enjoying your guests rather than last-minute dessert preparation.
I encourage you to make this peanut butter icebox cake your own by experimenting with the variations suggested or creating your own signature twist. Perhaps add a layer of sliced bananas, swirl in some strawberry preserves, or incorporate a splash of coffee liqueur for an adults-only version. The possibilities are endless!
Whether you’re looking for a crowd-pleasing dessert for your next gathering, a make-ahead treat for a busy week, or simply a way to satisfy your peanut butter cravings, this icebox cake delivers on all fronts. Give it a try, and I’m confident it will earn a permanent spot in your dessert rotation!
Peanut Butter Icebox Cake Recipe Card
PrintPeanut Butter Icebox Cake
- A deliciously rich no-bake dessert featuring layers of graham crackers, creamy peanut butter, and chocolate.
- Perfect for summer gatherings when you don’t want to heat up the kitchen.
- Make it ahead of time for stress-free entertaining!
- Prep Time: 25
- Total Time: 25 minutes
- Yield: 10 servings 1x
- Category: Dessert
- Method: No-Bake
- Cuisine: American
Ingredients
- 1 cup creamy peanut butter
- 1/2 cup melted chocolate
- 1/4 cup unsalted butter, melted
- 1 cup powdered sugar
- 1 tsp vanilla extract
- 1 cup heavy cream
- 2 cups crushed graham crackers
- 1/4 tsp sea salt
- 1/2 cup chopped roasted peanuts (optional)
- 1/4 cup mini chocolate chips (optional)
- Extra melted chocolate for drizzling (optional)
- Whipped cream for serving (optional)
Instructions
- Mix melted butter with powdered sugar in a medium bowl until well combined.
- Press the mixture firmly into the bottom of a 9-inch springform pan to form the crust.
- Combine crushed graham crackers with the butter mixture and spread evenly over the crust, pressing down gently.
- In a large mixing bowl, whisk together peanut butter, melted chocolate, sea salt, and vanilla until completely smooth.
- In a separate bowl, whip the heavy cream until soft peaks form, about 2-3 minutes.
- Gently fold the whipped cream into the peanut butter chocolate mixture using a rubber spatula.
- If using, fold in chopped peanuts and mini chocolate chips.
- Pour the peanut butter mixture over the crust, spreading evenly with an offset spatula.
- Tap the pan gently on the counter to release any air bubbles.
- Refrigerate for at least 4 hours or overnight until completely set.
- Before serving, run a thin knife around the edge and release the springform pan.
- Drizzle with additional melted chocolate if desired.
- Slice and serve chilled.
Notes
- For best results, chill the cake overnight to allow flavors to fully develop and texture to set properly.
- Make sure to use regular creamy peanut butter, not natural varieties that separate.
- For cleaner slices, dip your knife in hot water and wipe dry between cuts.
- Nutrition facts are estimates and may vary based on ingredients used, portion sizes, and preparation methods.
Nutrition
- Serving Size: 1 slice
- Calories: 385
- Sugar: 24
- Sodium: 215
- Fat: 26
- Saturated Fat: 12
- Unsaturated Fat: 12
- Carbohydrates: 35
- Fiber: 2
- Protein: 7
- Cholesterol: 45
Keywords: peanut butter icebox cake, no-bake desserts, icebox cake recipes, peanut butter desserts, quick frozen treats
Let’s connect! Follow me for more Joylicious Recipes: Facebook, Instagram, Pinterest