The Best Homemade Ice Cream Cones – Simple Ingredients, Big Crunch
Ice cream cones are more than just holders for frozen treats—they’re a crunchy, edible part of the dessert experience. In this article, you’ll discover how to make cones at home with simple ingredients. We’ll also explore what makes them so tasty, how to avoid sogginess, and which toppings turn a good cone into a great one.
Additionally, we’ll break down the exact steps, cover FAQs, and even dive into a quirky gardening technique inspired by cones. Whether you’re making cones for a party or just a fun night in, this guide has everything you need.
Don’t miss our Easy Crumbl Sugar Cookie Recipe for another crowd-pleasing homemade dessert idea.
Introduction to Ice Cream Cones
The Origins of the Ice Cream Cone
Ice cream cones made their debut in 1904 at the St. Louis World’s Fair. Louis World’s Fair. At the event, one ice cream vendor ran out of serving dishes. Fortunately, a nearby waffle seller offered help by rolling a waffle into a cone shape. As a result, the edible cone was born—and it changed desserts forever.
Since then, cones have become a staple across the globe. From sugar cones to waffle and cake cones, there’s a type for everyone. Not only do they hold ice cream, but they also add flavor and crunch to every bite.
Why Ice Cream Cones Became a Dessert Icon
There’s a reason cones became so iconic. First, they’re fun to eat. Second, they eliminate the need for bowls or spoons. And third, they offer a crispy contrast to soft, creamy ice cream.
In fact, the best part might be biting into the chocolate-filled bottom—just as the last bit of ice cream melts inside. It’s a simple joy that never gets old.
Check out this Peach Ice Cream Recipe for a delicious match with your homemade cones.
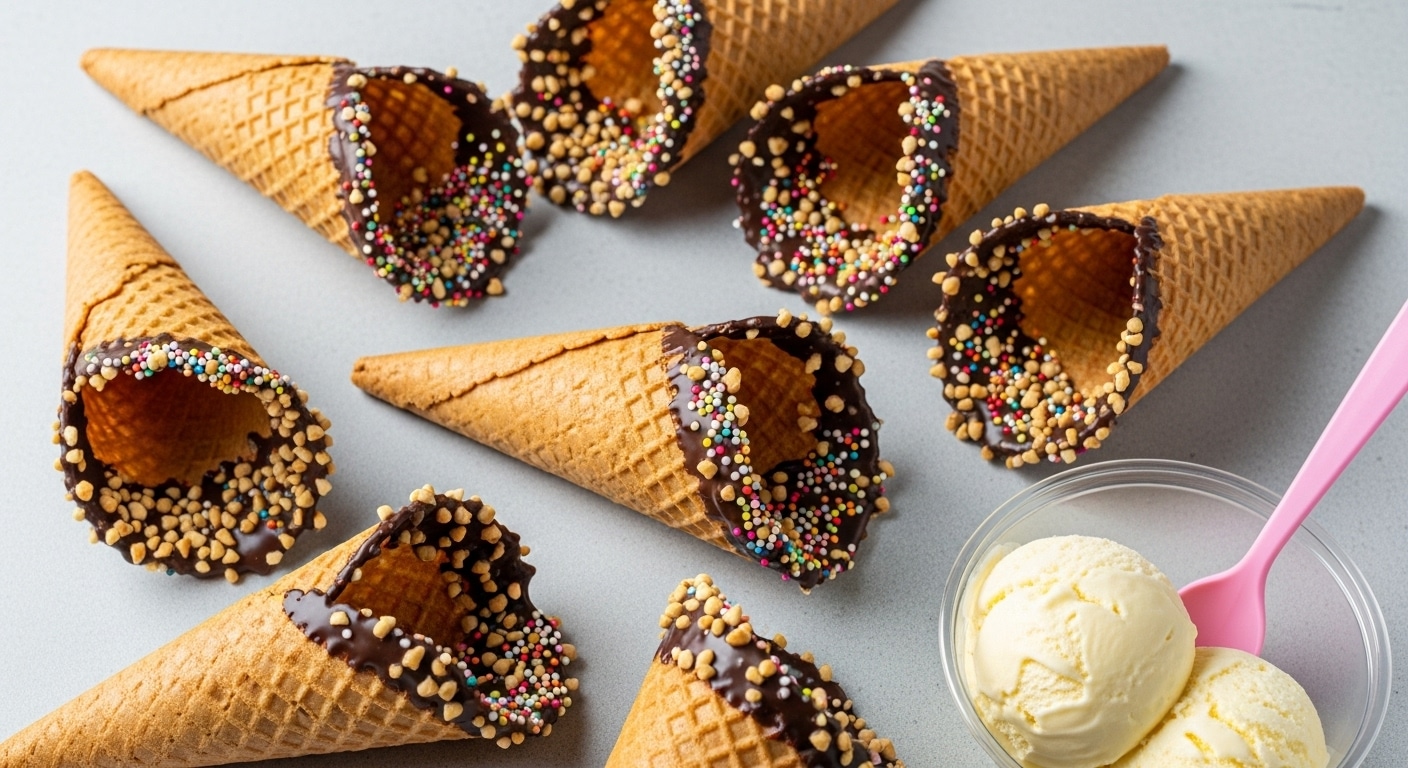
Furthermore, cones let you get creative. You can dip them in chocolate, roll them in nuts or sprinkles, or stuff them with marshmallows. They’re customizable, colorful, and always a hit at parties.
PrintThe Best Homemade Ice Cream Cones – Simple Ingredients, Big Crunch

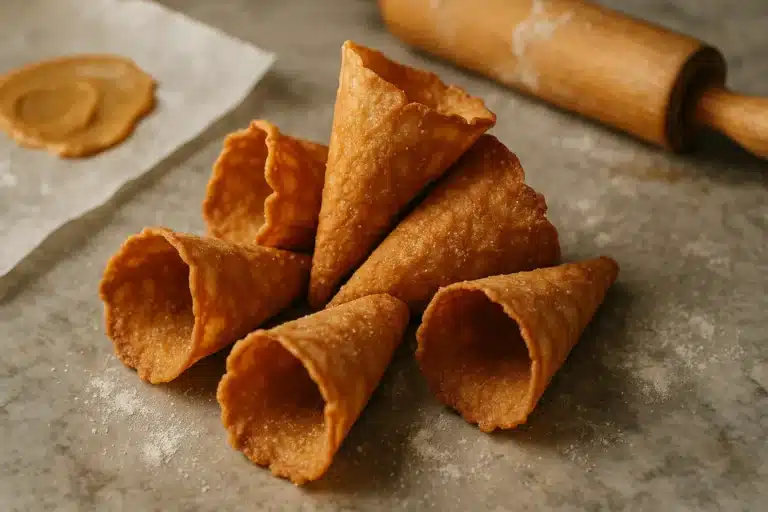
These homemade ice cream cones are crispy, golden, and easy to make with pantry staples. Customize them with chocolate dips and fun toppings for the ultimate summer treat!
- Prep Time: 10 mins
- Cook Time: 30 minutes
- Total Time: 40 minutes
- Yield: 8 cones 1x
- Category: Dessert
- Cuisine: American
Ingredients
Plain Cones:
2 egg whites (medium eggs)
½ cup granulated sugar (100g)
A pinch of salt
3 tbsp milk
2 tbsp unsalted butter, melted
¾ cup all-purpose flour (100g)
Chocolate-Dipped Cones:
2 oz dark chocolate, melted (60g)
2–3 marshmallows
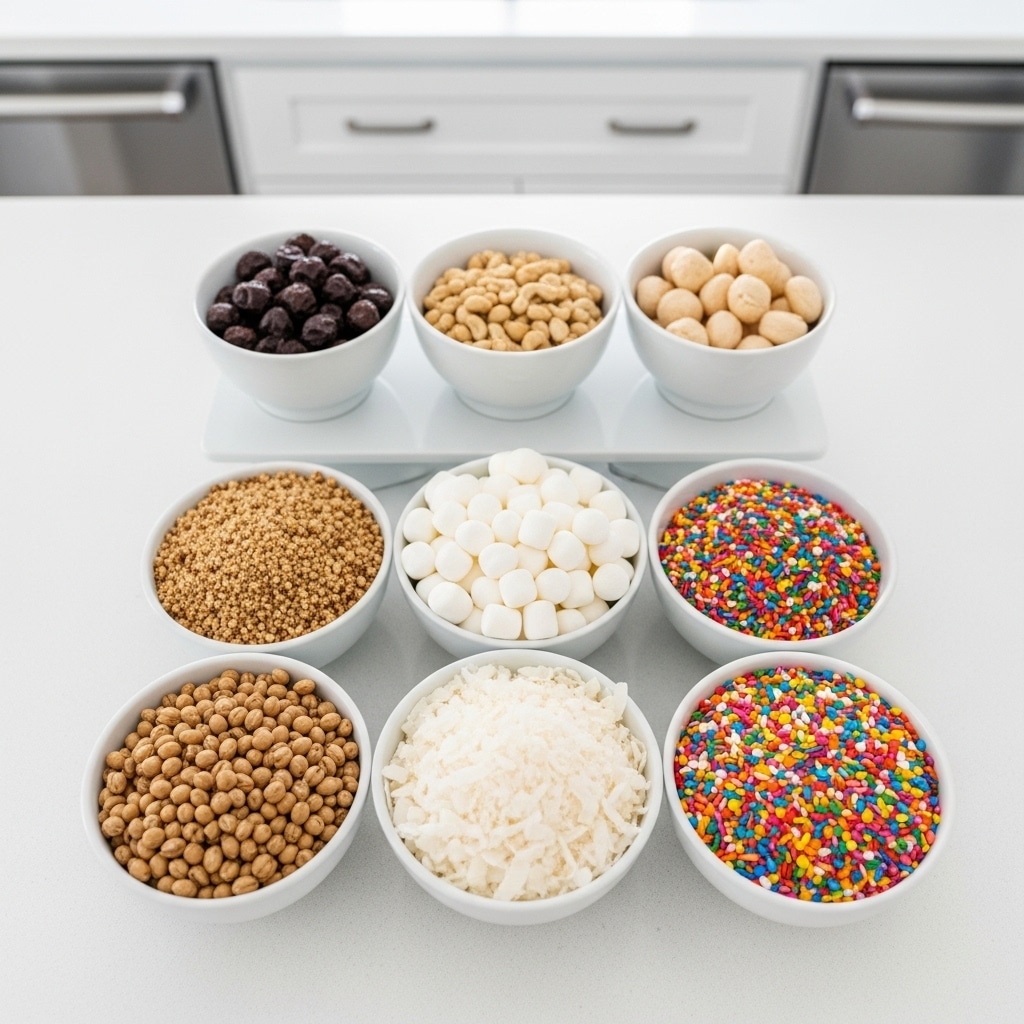
Optional toppings: chopped nuts, sprinkles, shredded coconut
Instructions
Make the Batter
Whisk egg whites and sugar until foamy. Add salt, milk, and melted butter. Stir in flour and mix until smooth.Shape and Bake
Spoon 1½ tbsp of batter onto a silicone mat. Spread into a thin, round circle (6 in). Bake at 400°F (200°C) for 6–8 minutes until golden.Form the Cones
Quickly roll baked discs around an aluminum cone mold. Let cool with the mold inside to hold the shape.Add Chocolate Dip
Dip cone tops in melted chocolate. Roll in toppings if desired. Chill until set.Seal the Base
Insert marshmallow pieces into the tip to prevent leaks. For extra crunch, drizzle chocolate inside and let harden.
Notes
Chocolate-dipped version includes approx. 7.5g chocolate and trace from toppings.
Marshmallows add negligible nutrition per cone when used as a seal.
No added cholesterol due to use of egg whites only.
Nutrition values may vary slightly based on thickness and exact portioning.
Nutrition
- Serving Size: 8 cones
- Calories: 170 kcal
- Sugar: 15 g
- Fat: 6 g
- Saturated Fat: 3 g
- Carbohydrates: 26 g
- Fiber: 1 g
- Protein: 2 g
- Cholesterol: 7 mg
Keywords: Dark chocolate, egg whites, all purpose flour, Chocolate chips, butter, nuts, eggs, white sugar, milk, tapioca starch, Heavy cream, powdered sugar, cinnamon
How Ice Cream Cones Are Made (Manufacturing & Homemade)
Mass-Production Techniques in Factories
Ever wonder how ice cream cones are made on a massive scale? In commercial factories, cone production is a fast, automated process. Large mixers first blend ingredients like flour, sugar, and water into a smooth batter. Then, machines pour that batter into heated molds, which press and bake the cones in seconds.
Once baked, robotic arms shape the soft wafers into cones before they harden. After that, the cones are cooled, inspected for cracks, and packed for delivery. The process takes just minutes per batch, yet produces thousands of cones every hour. It’s all about speed, consistency, and crispness.
In fact, factories often tweak the ingredients to extend shelf life and increase crunch. Stabilizers and preservatives are commonly added to prevent sogginess during transport and storage.
Step-by-Step Homemade Method with Easy Ingredients
Of course, not everyone has a factory at home. Luckily, making ice cream cones from scratch is simple—and fun. All you need are a few basic ingredients, a silicone mat, and a little patience. Here’s how to do it:
Plain Ice Cream Cones
Ingredients:
- 2 egg whites (medium eggs)
- ½ cup granulated sugar (100g)
- A pinch of salt
- 3 tbsp milk
- 2 tbsp unsalted butter, melted
- ¾ cup all-purpose flour (100g)
Instructions:
- In a mixing bowl, whisk the egg whites and sugar until foamy. Add salt, milk, and melted butter. Mix well.
- Stir in the flour and whisk until smooth. The batter should be thick but spreadable.
- Spoon 1½ tablespoons of batter onto a silicone mat (on a baking tray). Spread into a thin, 6-inch circle.
- Bake at 400°F (200°C) for 6–8 minutes or until the edges turn golden.
- Immediately shape the discs into cones using an aluminum mold. Use a towel to avoid burning your fingers.
- Let the cones cool with the mold inside. Repeat the steps with the remaining batter.
Pro Tip: If the batter spreads too much, simply add a bit more flour.
Looking for inspiration? Try these Strawberry Shortcake Ice Cream Cones for a fruity summer twist.
Chocolate-Dipped Cones
Ingredients:
- 2 oz dark chocolate (melted)
- 2–3 marshmallows
- Optional: sprinkles, chopped nuts, shredded coconut
Instructions:
- Gently coat the rim of each cone with melted chocolate. Add sprinkles or nuts if desired.
- Chill until the chocolate sets.
- To prevent leaks, press a piece of marshmallow into the bottom of the cone.
- For a double dip, coat the inside of the cone in chocolate too. Chill again.
These homemade cones last up to 3–4 days. Store plain ones in an airtight container and chocolate-coated ones in the fridge.
Discover great ideas like Mango Popsicles that are perfect for stuffing inside cones too!

Ingredients in Ice Cream Cones
Classic Cone Ingredients Explained
The base of any great ice cream cone starts with just a handful of simple ingredients. Surprisingly, you don’t need anything fancy to get that golden, crispy texture. Most traditional cones include egg whites, sugar, milk, butter, flour, and a pinch of salt.
Each ingredient plays a unique role. Egg whites give the cone structure and lightness. Sugar adds sweetness and helps the edges caramelize for that golden-brown crunch. Milk and melted butter contribute to the smooth batter, while flour binds everything together. Even the small pinch of salt matters—it enhances flavor and balances the sweetness.
Here’s a quick look at the essentials used in homemade cones:
| Ingredient | Purpose |
|---|---|
| Egg Whites | Adds light structure and crisp texture |
| Granulated Sugar | Sweetens and helps brown the edges |
| Milk | Creates smooth, pourable batter |
| Unsalted Butter | Adds richness and improves texture |
| All-Purpose Flour | Gives the cone body and structure |
| Salt | Enhances and balances flavor |
Don’t miss our Texas Roadhouse Honey Cinnamon Butter—it’s a perfect sweet topping if you want to experiment with dessert cones.
Variations: Sugar Cones, Waffle Cones, and Chocolate-Dipped Cones
There’s more than one way to make an ice cream cone. While the basic recipe remains similar, small changes in the ingredients and technique can lead to very different results.
Sugar cones are baked longer and usually contain a bit more sugar. That results in a deeper color and a rich, caramel-like crunch. They’re thinner and crispier than regular cones, with a pointed bottom perfect for holding soft-serve.
Waffle cones are made using a waffle iron or a specialized press. The batter often includes vanilla extract or cinnamon, giving them a richer flavor. Their pattern adds texture and makes them ideal for large scoops.
Chocolate-dipped cones, on the other hand, add a layer of indulgence. Not only do they look stunning, but the chocolate coating acts as a barrier, helping keep the cone from getting soggy too quickly. Adding crushed nuts, sprinkles, or coconut on top takes them to another level.
From flavor to texture, these variations allow for creative expression—and make every cone a little more special.
What Makes Ice Cream Cones Taste So Good?
The Role of Texture and Crunch Factor
There’s something undeniably satisfying about biting into a crisp ice cream cone. The contrast between the cold, creamy ice cream and the warm, crunchy cone makes every bite more enjoyable. Texture plays a huge role in the overall flavor experience.
Unlike soft waffle bowls or plastic cups, cones give a sensory thrill. You feel the snap as you bite down. Then the flavors hit—mildly sweet, lightly toasted, and just enough richness to complement the ice cream. It’s this textural interplay that keeps cones a fan favorite.
Crispness doesn’t just happen by chance. It’s the result of precise baking and balanced ingredients. Flour and egg whites provide structure, while sugar caramelizes at the edges. The golden shell you see isn’t just beautiful—it’s engineered for crunch.
Flavor Enhancers: Butter, Sugar, and Toasted Edges
Flavor starts with the ingredients, but it’s the subtle tweaks that truly elevate it. Most homemade ice cream cones include butter—not just for texture, but for taste. It adds depth and a hint of richness that plain cones lack.
Sugar, especially when baked at the right temperature, creates a slight caramel edge. That toasted layer delivers a nutty, almost toffee-like finish that pairs beautifully with vanilla, chocolate, or fruit-based ice creams.
Even the slight browning around the cone edges plays a role. It adds that gentle bitterness you might associate with toasted marshmallows or golden pie crusts—those tiny flavor details that trigger food nostalgia.
Explore flavors beyond desserts with this Blackberry Basil Ricotta Pizza—a bold balance of sweet and savory, just like a well-crafted cone!
Soggy Ice Cream Cones? Here’s What’s Going Wrong
Moisture Traps and Ice Cream Meltdown
Even the best homemade ice cream cones can turn soggy if you’re not careful. The number one culprit? Moisture. As the ice cream starts to melt, it seeps into the cone, softening the crispy structure from the inside out. If you’ve ever had a cone fall apart in your hand, you know exactly how fast things can go wrong.
The cone’s tip is especially vulnerable. Since gravity pulls the melted ice cream downward, it tends to collect at the bottom. Without a proper barrier, that moisture soaks through the base, making it sticky and limp.
The temperature of the cone can also be a factor. For example, if the cone is warm when you scoop in the ice cream, the cold dessert will melt even faster—speeding up the sogginess.
How to Store Cones Properly to Keep Them Crispy
Thankfully, there are some simple tricks to keep your ice cream cones fresh and crunchy. First, always let your cones cool completely before using or storing them. Trapped steam is a hidden enemy—it turns that delightful crunch into a chewy mess.
For plain cones, an airtight container is your best friend. Keep them in a cool, dry place at room temperature. If you live in a damp climate, toss a food-safe silica gel pack into the container to absorb excess moisture.
Chocolate-coated cones offer even more protection. The melted chocolate acts as a barrier between the ice cream and the cone. For extra defense, press a piece of marshmallow into the bottom of the cone. It seals the hole and stops leaks from dripping through.
Want more freezer-friendly ideas? Learn more about Berries and Cream Treats that work great with cones or bowls!
Also, never store cones in the fridge unless they’re already dipped in chocolate. The fridge introduces moisture, which can soften plain cones quickly.
Ice Cream Cone Recipe (Plain and Chocolate-Dipped)
Ingredients List (Plain + Chocolate-Dipped)
Making ice cream cones from scratch is easier than you might think. The best part? Chances are, the ingredients are already sitting in your pantry. Below is everything you need to make both classic plain cones and chocolate-dipped versions.
Plain Ice Cream Cones
- 2 egg whites (medium eggs)
- ½ cup granulated sugar (100g)
- A pinch of salt
- 3 tbsp milk
- 2 tbsp unsalted butter, melted
- ¾ cup all-purpose flour (100g)
Chocolate-Dipped Ice Cream Cones
- 2 oz dark chocolate, melted (60g)
- 2–3 marshmallows
- Optional extras: sprinkles, chopped nuts, shredded coconut, colored sugar
Instructions for Homemade Cones – Rephrased & Simplified
Step-by-Step: Plain Ice Cream Cones
- In a bowl, whisk egg whites and sugar until frothy.
- Add salt, milk, and melted butter. Stir to blend.
- Mix in the flour gradually and whisk until smooth. The batter should be slightly thick but spreadable.
- Spoon about 1½ tablespoons of batter onto a silicone baking mat placed on a tray. Spread it thin into a 6-inch (15 cm) circle.
- Bake at 400°F (200°C) for 6–8 minutes, or until the edges are golden.
- Once baked, quickly loosen the disc with a spatula. Roll it around an aluminum cone mold while it’s still hot—use gloves or a towel to avoid burns.
- Let the cone cool on a rack with the mold still inside. Repeat until the batter is used up.
Tip: If your batter seems too runny, add a bit more flour to thicken it. The texture should resemble a loose pancake batter.
Step-by-Step: Chocolate-Dipped Cones
- Melt the dark chocolate and pour it into a shallow bowl.
- Gently swirl the rim of each cone through the chocolate until coated.
- While the chocolate is still wet, roll the edge in your chosen toppings—sprinkles, nuts, or coconut work great.
- Chill until the chocolate sets.
- To seal the bottom of the cone, tear a marshmallow into a small piece and press it into the tip.
- For extra protection, drizzle a little chocolate inside the cone and let it harden.
Don’t miss our Strawberry Shortcake Ice Cream—a perfect pairing for homemade cones!

Ice Cream Cone Grafting Technique (Unusual but Real)
What Is Ice Cream Cone Grafting in Gardening?
Surprisingly, “ice cream cone grafting” isn’t a dessert term—it’s a real gardening technique. This method gets its name from the cone-shaped wrapping used during the grafting process. Instead of edible cones, the “cone” here is made of grafting tape or waxed paper.
In this technique, gardeners cut a small seedling and attach it to the rootstock of another plant. Then, they wrap the graft union in a cone-shaped cover, much like an actual ice cream cone. This helps protect the graft from moisture loss, pests, and disease during the healing stage.
Although the method sounds sweet, it’s all science. The cone shape allows for airflow while sealing in enough moisture to encourage the plants to fuse properly. It’s especially popular in fruit tree propagation and heirloom vegetable gardening.
Why It’s Named That & How It’s Done
So why the name “ice cream cone”? The answer is simple: visual similarity. The paper or plastic cone used in the process resembles the ones you’d eat, and once the term caught on among growers, it stuck.
Here’s a quick breakdown of how the grafting method works:
- A clean cut is made on both the scion (top plant) and the rootstock (bottom plant).
- The two parts are joined together so their vascular tissues align.
- The graft is secured using a wrap shaped like a cone.
- The cone also protects the new graft from drying out or being exposed to direct sun.
- After a few weeks, the cone is removed, and the grafted plant continues to grow as one.
This method might not be edible, but it’s definitely cool.
Looking for more unique techniques? Don’t miss our Ditalini Pasta Recipe for a comforting classic with a creative twist.
Serving and Storing Homemade Ice Cream Cones
How to Serve and Seal Cones for Leaky-Free Enjoyment
Once your homemade ice cream cones are ready, it’s time for the fun part—filling and serving! But before you scoop in that creamy goodness, take one extra step to avoid leaks.
Start by sealing the tip of each cone. This tiny opening can quickly become a drip zone as the ice cream melts. A simple trick? Tear a marshmallow into a small piece and press it firmly into the cone’s bottom. Not only does it stop the mess, but it also adds a sweet surprise at the very end of your treat.
Want to go a step further? Drizzle melted chocolate inside the cone before adding ice cream. Once it hardens, the chocolate creates a waterproof barrier that keeps your cone crispy longer. Plus, it tastes amazing.
For best presentation, fill cones just before serving. Letting them sit too long with ice cream inside increases the chance of sogginess—even with a seal in place.
Storage Tips for Homemade Cones (Fridge vs. Air-Tight Containers)
To keep your ice cream cones fresh and crispy, storage matters. Once cooled completely, place the plain cones in an airtight container. This keeps moisture out and preserves the crunch. Make sure to store them in a dry, room-temperature space—away from humidity and direct sunlight.
If you’ve made chocolate-dipped cones, store them in the refrigerator. The chilled temperature helps the chocolate stay firm and prevents melting. Use a flat tray or airtight container lined with parchment paper to keep them from sticking together.
Avoid placing plain cones in the fridge. Cold temperatures cause condensation, which can leave the cones soft and soggy. Always keep them dry and protected.
Check out our full Recipes Collection for even more sweet and savory ideas that pair well with crunchy cones!
Creative Twists and DIY Cone Toppings
Fun Add-ons: Sprinkles, Marshmallows, Coconut & Nuts
Homemade ice cream cones are great on their own, but you can take them to a whole new level with creative toppings. Customizing your cones adds flavor, texture, and a touch of personality—perfect for parties, holidays, or just for fun.
Try dipping the top rim of your cone in melted chocolate, then roll it in your favorite add-ons while the chocolate is still soft. Here are some tasty combinations to inspire you:
| Topping Ideas | Flavor Notes |
|---|---|
| Rainbow Sprinkles | Sweet and festive crunch |
| Crushed Nuts | Nutty and slightly salty bite |
| Shredded Coconut | Soft, tropical texture |
| Crushed Graham | Buttery, pie-crust flavor |
| Mini Marshmallows | Chewy and gooey surprise inside |
| Colored Sugar | Sparkly crunch and bright color |
Want to turn your cones into full dessert cups? Just coat the inside with chocolate, then let it set. Now you’ve got a mini edible bowl perfect for mousse, yogurt, or no-churn ice cream.
Don’t miss our Recipes Page for fun treats you can serve inside your decorated cones.
Festive Ideas for Parties and Holidays
Hosting a themed event? Dress up your cones to match. For a Christmas treat, use white chocolate and red-green sprinkles. For Halloween, try orange-colored sugar and crushed Oreo cookies. Even a simple birthday party can feel extra special with rainbow toppings and candy pieces.
Want to make it interactive? Set up a DIY cone station. Set out different dips and toppings for guests to create their own custom cones. It’s fun, hands-on, and kid-approved.
Check out our Easy Crumbl Sugar Cookie Recipe—it’s another customizable dessert that plays well at parties.
These little cone upgrades turn a basic treat into an Instagram-worthy experience. Simple, creative, and unforgettable.
FAQ: All About Ice Cream Cones
Factory-made ice cream cones are produced using automated machinery. A smooth batter—usually made with flour, sugar, and water—is poured into heated molds that press and bake the cones into shape. After a quick bake, they’re rolled, cooled, and packaged within minutes. At home, you can use a silicone mat and oven to create similar cones using simple ingredients like egg whites, butter, and flour.
Most traditional ice cream cones contain flour, sugar, egg whites, milk, butter, and salt. These ingredients combine to create a thin, spreadable batter that bakes into a crisp shell. Variations like sugar cones may include more sugar for a deeper caramel flavor, while waffle cones might have added vanilla or cinnamon.
It’s all about texture and subtle sweetness. The contrast between creamy ice cream and a crisp, slightly caramelized cone makes each bite more satisfying. Toasted edges, buttery undertones, and a hint of salt create a well-balanced flavor that complements any frozen dessert.
Moisture is the main issue. As ice cream melts, it seeps into the cone—especially near the bottom—causing it to soften. Storing cones improperly, like in humid environments or the fridge, can also lead to sogginess. To prevent leaks, seal the tip with chocolate or marshmallow and store cones in a dry, airtight container.
In 1904, the ice cream cone made its debut at the St. Louis World’s Fair. Louis World’s Fair. When an ice cream vendor ran out of dishes, a nearby waffle seller rolled a fresh waffle into a cone shape. This clever improvisation became a hit and launched the edible cone trend that continues today.
Conclusion: Elevate Every Scoop with Homemade Ice Cream Cones
From their humble beginnings at a world fair to your kitchen counter, ice cream cones have become more than just dessert holders—they’re part of the joy of eating ice cream. Whether you’re crafting plain cones, dipping them in chocolate, or adding festive toppings, these edible delights bring texture, flavor, and fun to every bite.
By following the tips in this guide, you’ll avoid soggy bottoms, create crowd-pleasing cones, and maybe even inspire your next party theme. And don’t forget—cones aren’t just for ice cream anymore. Fill them with mousse, fruit, or candy for a treat that’s both creative and delicious.
Learn more about joyful recipes like these to expand your sweet and savory cone creations.